Your cart is currently empty!
A handmade card: a great way say I’m Here for You

/
Would you like to experiment with a design like this? Below, you’ll find a supply list, including a link to the stencil I used from A Colorful Life Designs. Follow the link and use discount code ChrisFan10 to save 10% on your entire order! (Master Creator Bundles are excluded as they already have a 20% discount built in.)
A handmade card, sent with love is a great way to say Here For You.
Let’s Get Started:
Card Base: 5.5 x 8.5, scored and folded at 4.25
Card Face: 5.25 x 4 (before tearing)
Several pieces of scrap white cardstock for flowers & leaves
Vellum: 2.5” circle & 6.25 x 1.5” strip
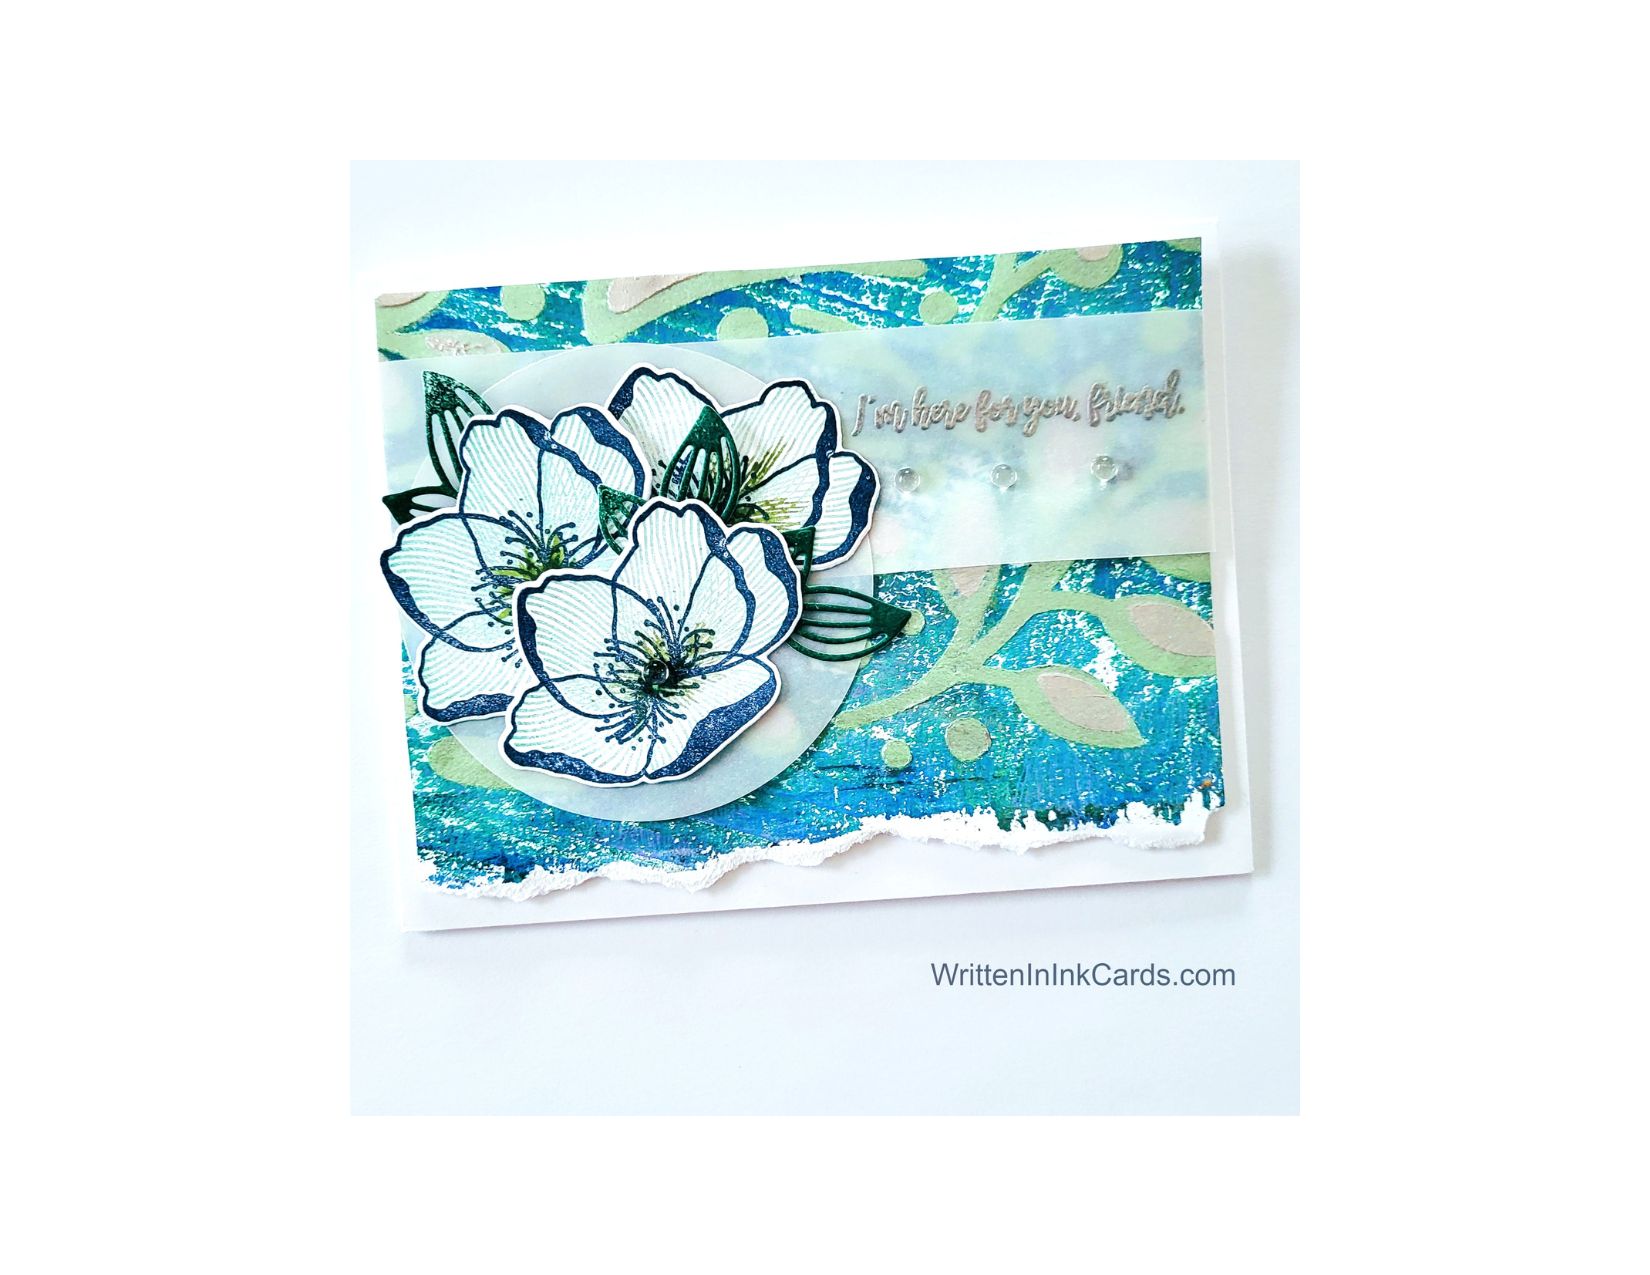
Card Face
- I had a gel print that I wanted to use: I cut this to size and laid it on a piece of scrap paper.
- I put the stencil in place, securing it with Mint Tape
- I spread DIY* mint-coloured embossing paste** across the first layer of the stencil. I removed the stencil carefully to avoid smudging the design, and put it into water immediately.
- After the first layer had dried I put the second layer of the stencil in place and spread white embossing paste across the surface. Again, I removed the stencil carefully and put it immediately into water.
*See Homemade Embossing Paste under Stretch Your Pennies in the header
** See Multi-Media Products and Stencils under Techniques in the header
Other:
- I put the extra pieces of cardstock into my stamp positioner one at a time and stamped the first layer of the flower, creating the outer rim of the petals as well as the center of the blossom with dark teal ink.
- I repeated the process with medium teal ink for the inside of the petals.
- I pressed the dark teal ink pad directly to a piece of white cardstock and then die-cut four leaves from this piece.
- I used an embossing buddy liberally on the strip of vellum, and then put it into my stamp positioner. I added the sentiment with Versamark embossing ink and sprinkled on some silver embossing powder which I set with my heat gun.
Assembly
I wrapped the strip of vellum around the card face towards the top as shown in the image, securing the ends on the back with scotch tape.
I tore a narrow strip off of the bottom of the card face to create an uneven edge, and then glued it to the card base.
I experimented with the placement of the flowers and leaves on the vellum circle: once I was satisfied with the design I used liquid glue to secure these. I used dimensionals behind the flowers in a couple of spots to separate the layers and create dimension.
I put glue on the back of the vellum circle (behind the blossoms, so it wouldn’t be seen through the vellum) and glued it in place as shown.
when using liquid glue on vellum, I apply it very sparingly, and then blot before it is affixed. Vellum warps very easily when it comes in contact with moisture, but will tolerate a small amount.
Final Thoughts:
I’m really liking the combination of rustic feeling card face with the more finished feel of the vellum and blossoms. It creates subtle tension and interest.
Supplies: (and links where possible)
I have listed which products I have used, and where they may be purchased. It’s a huge marketplace; in most instances, there are multiple sources and many alternatives.
Stencil: Layered Fall Foliage, A Colorful Life Designs
Versamark Embossing Ink: Simon Says Stamp
Silver Embossing Powder: Wow, Simon Says Stamp
Vellum: Stampin’ Up! (retired)
Adhesive: Tombow Aqua, Michaels
Card Base & Card Face: Accent 100 lb., Amazon
Leave a Reply