Your cart is currently empty!
Category: Fixing Blunders
An easy creative solution to a BIG cardmaking Blunder

What to do when you’ve invested time and materials, but then it all goes sideways? When that happens to me I hate having to scrap the time and materials invested in the piece.
Errors are opportunities for creativity! Read on to learn more ….
Let’s get Started:
Card Base: 5.5 x 8.5, scored and folded at 4.25
Border Layer: 5.5 x 4.25
Card Face: 5.5 x 4
Card Face:
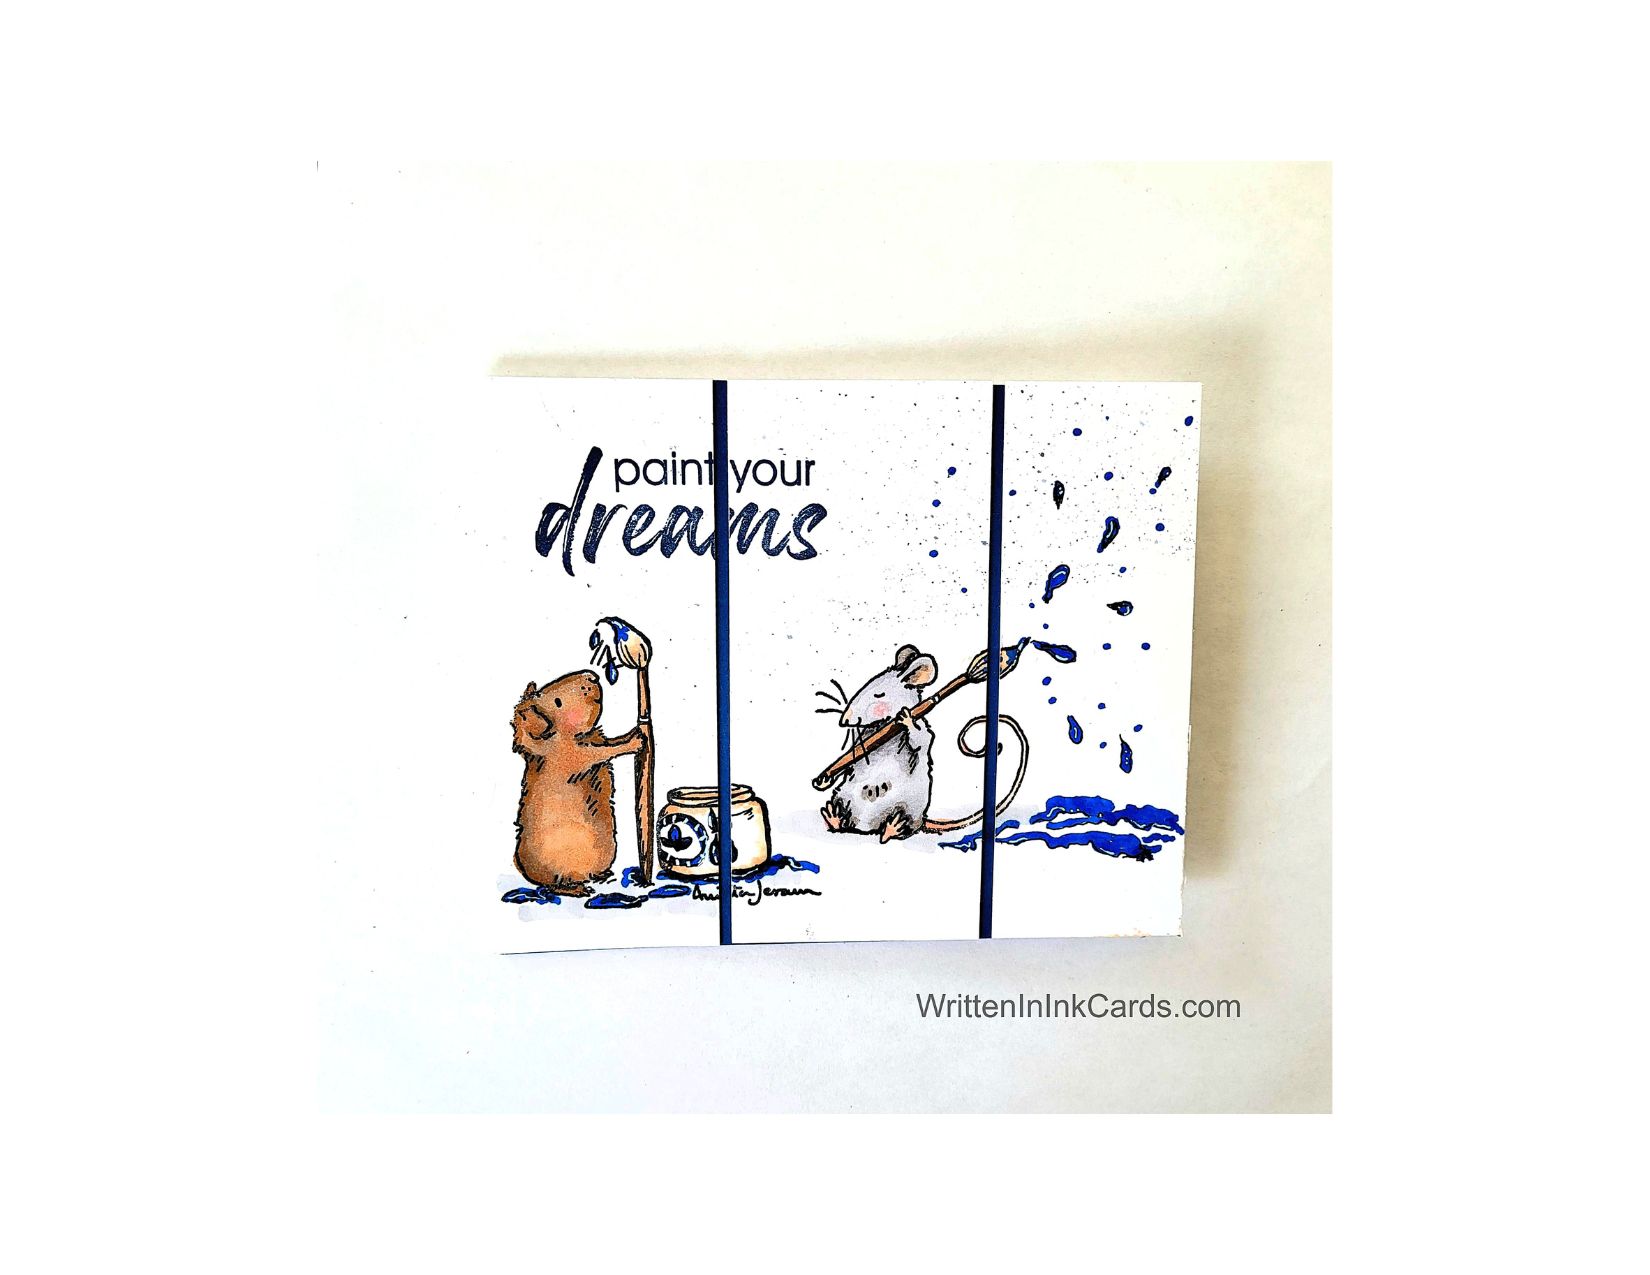
I stamped the images in black Memento ink and colored them with alcohol markers. I was happy with the result, as coloring isn’t my strong suit.
Then I put this aside for a period of time, trying to decide how to finish the piece. When I picked it back up again I was dismayed to see that it had been sitting too close to something messy – there was a fine blue spatter in the upper right. (Probably from cleaning a stencil, and simple carelessness with my work!). How to salvage the time and materials…. ???
I added both large and small drops of paint above the brush. I used a fine liner to outline the drops and a blue alcohol marker to fill them in. I also added small dots of blue marker here and there to bridge between the fine spatter and the larger drops. It worked – I was delighted with the result, I had successfully camouflaged my error!
I carried this one step further by creating puddles of paint under the brush. (There were puddles around the paint pot, but not under this paintbrush).
I used a white gel pen to add accents here and there in the scene.
I put the card face into my stamp positioner and added the sentiment.
I cut the card face into three panels, 1 ⅓” each.
Assembly
I glued the border layer to the card base.
I glued the three pieces of the card face onto this, spacing evenly.
Final Thoughts:
I love Anita Jeram’s work, and was so happy with the images as placed and coloured. (I don’t pretend to be an expert with any form of colouring, so when I get something that I’m satisfied with, I’m happy!).
Then I was dismayed to notice the spatter, and finally, happy again when the problem was resolved.
Happy – dismayed – happy. Sounds like a movie theme! 😆
Of course if you want to avoid the need for a rescue operation, putting the card in a safe spot is definitely the way to go.
Supplies: (and links where possible)
I have listed which products I have used, and where they may be purchased. It’s a huge marketplace; in most instances, there are multiple sources and many alternatives.
Stamps: Paint the Town, Colorado Craft Co.,
Versafine Onyx, Simon Says Stamp
Memento Ink: Stampin’ Up!
Alcohol Markers:
Stampin’ Blends: Stampin’ Up!
Copics: Wallacks
Fineliners: Amazon
White Gel Pen: Arteza, Amazon
Adhesive: Tombow Aqua, Michaels
Card Base & Card Face: Accent 100 lb., Amazon
How to Rescue Your Card Designs from Mistakes

If you’re new, or experienced, or anything like me (!) you have run into situations where you need to rescue your card from a blunder.
Let’s get Started:
Card Base: 5.5 x 8.5, scored and folded at 4.25
Border Layer: 5.5 x 4.25
Card Face: 5.5 x 4
Card Face:
I stamped the images in black Momento ink and coloured them with alcohol markers.
Then I put this aside for a period of time, trying to decide how to finish the piece. When I picked it back up again I realized it had been sitting too close to something messy – there was a fine blue spatter in the upper right. (Probably from cleaning a stencil, and simple carelessness with my work!). How to salvage the time and materials…. ???
I added both large and small drops of paint above the brush. I used a fine liner to outline the drops and a blue alcohol marker to fill them in. I also added small dots of blue marker here and there to bridge between the fine spatter and the larger drops. It worked – I had successfully camouflaged my error!
I carried this one step further by creating puddles of paint under the brush. (There were puddles around the paint pot, but not under this paintbrush).
I used a white gel pen to add accents here and there in the scene.
I put the card face into my stamp positioner and added the sentiment.
I cut the card face into three panels, 1 ⅓” each.
Assembly
I glued the border layer to the card base.
I glued the three pieces of the card face onto this, spacing evenly.
Final Thoughts:
I love Anita Jeram’s work, and was so happy with the images as placed and coloured. (I don’t pretend to be an expert with any form of colouring, so when I get something that I’m satisfied with, I’m happy!).
Then I was dismayed to notice the spatter, and finally, happy again when the problem was resolved.
Happy – dismayed – happy. Sounds like a movie theme!
I’m so happy that I decided to rescue this card.😆
Supplies: (and links where possible)
I have listed which products I have used, and where they may be purchased. It’s a huge marketplace; in most instances, there are multiple sources and many alternatives.
Stamps: Paint the Town, Colorado Craft Co.,
Versafine Onyx, Simon Says Stamp
Memento Ink: Stampin’ Up!
Alcohol Markers:
Stampin’ Blends: Stampin’ Up!
Copics: Wallacks
Fineliners: Amazon
White Gel Pen: Arteza, Amazon
Adhesive: Tombow Aqua, Michaels
Card Base & Card Face: Accent 100 lb., Amazon