Your cart is currently empty!
Category: Fun
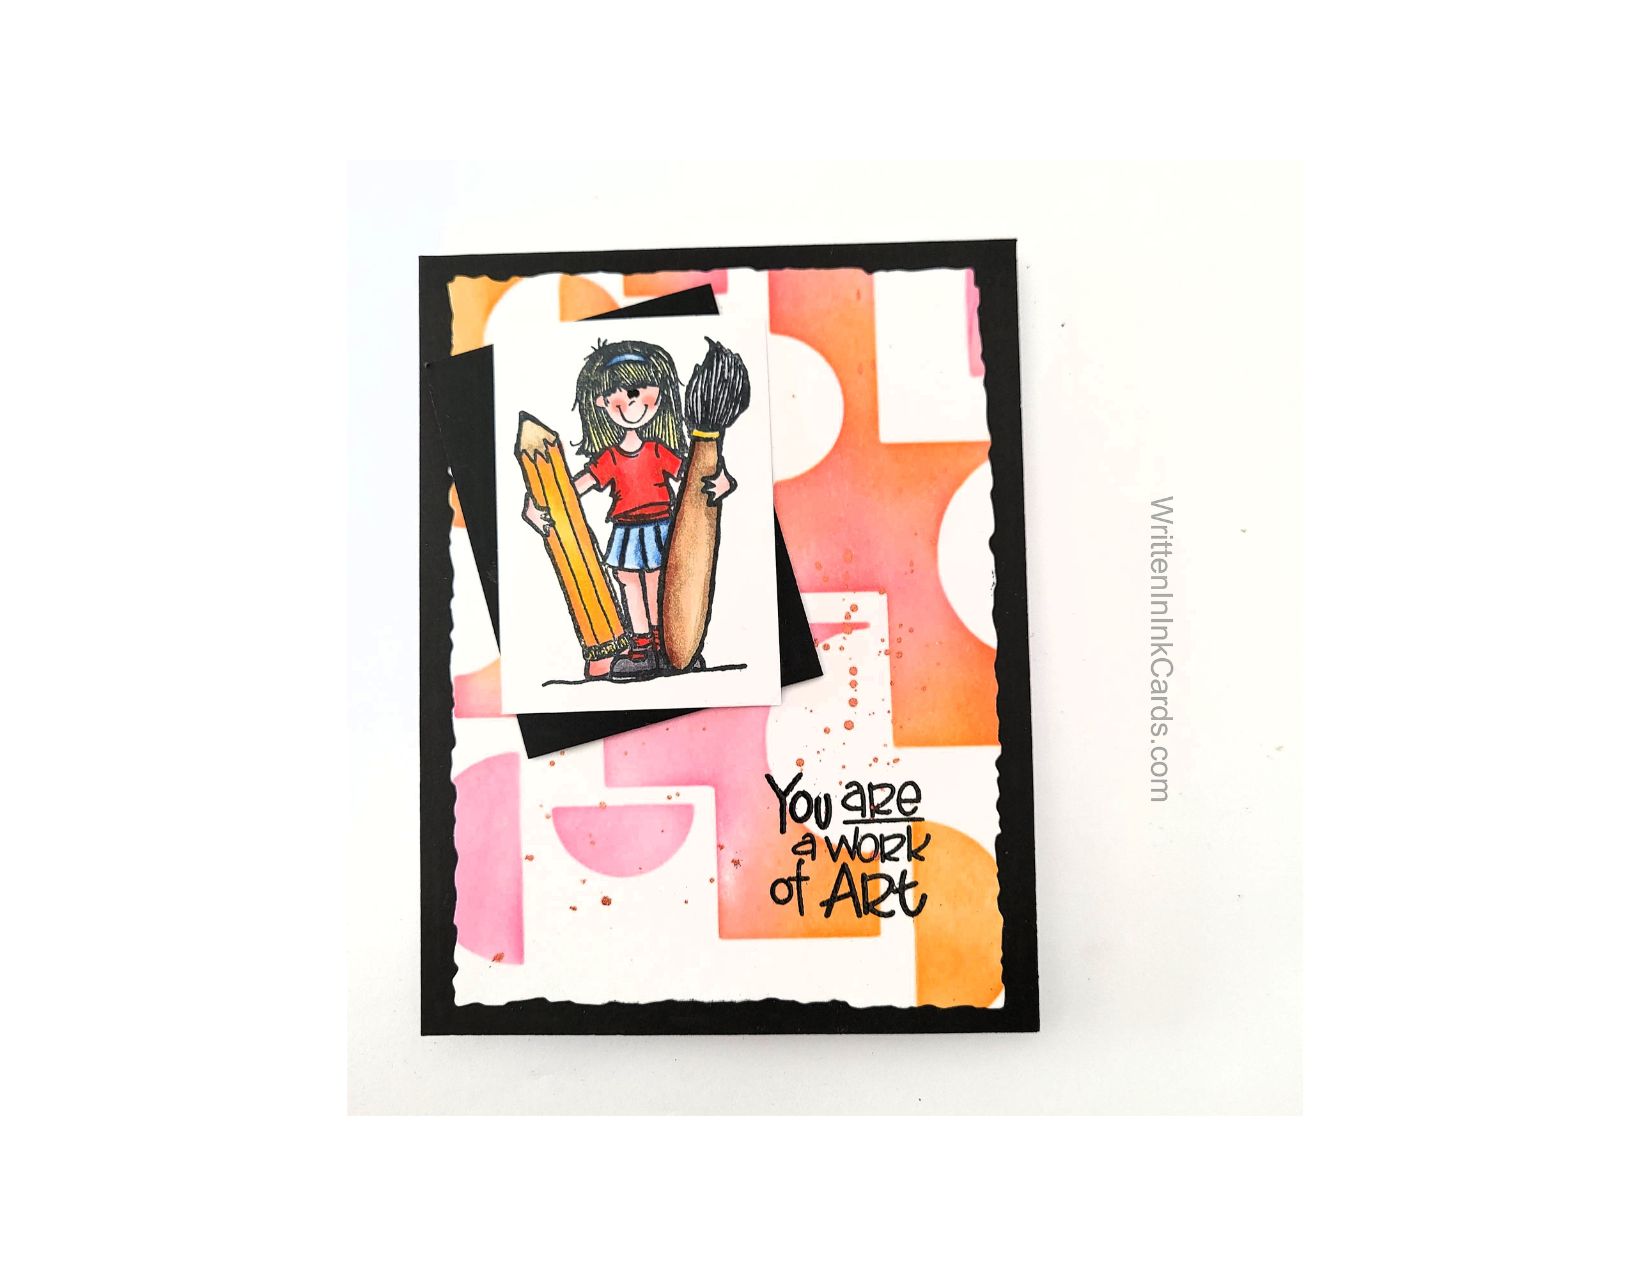
Celebrate someone special who is a work of art
Would you like to experiment with a design like this? You’ll find a supply list below, including a link to the stencil I used from A Colorful Life Designs. Follow the link and use discount code ChrisFan10 to save 10% on your entire order! (Master Creator Bundles are excluded as they already have a 20% discount built in.)
Let’s get Started:
Card Base: 5.5 x 8.5, scored and folded at 4.25
Border Layer: 5.5 x 4.25
Card Face: 5.5 x 4.25 (before die cut)
White Card Stock: 3 x 2
Black Cardstock: 3.25 x 2.25
Card Face:
- I began by laying the card face on my Grip Mat and positioning the stencil. I added pink and school bus yellow to the exposed areas, blending wherever the two colours met.
- Next I added metallic copper spatter towards the bottom left.
- After this dried, I finished the card face by putting it into my stamp positioner and adding the sentiment with Versafine Onyx.
- I used a deckled die to cut this down to the finished size.
Other:
- I stamped the image on the small piece of cardstock. I used Memento ink for this, which allowed me to colour the image with alcohol markers.
Assembly
- I glued the black border layer to the card base.
- Next, I experimented with placement for the focal image and its border layer. In the end I decided to offset them dramatically and glued them in place as shown.
Final Thoughts:
This is one of those times when I had created the background and then set it aside: I just didn’t know what I wanted to do with it. Then one day I pulled out this stamp set and inspiration struck: I think that this fun and funky girl is a great match for the stencilled background.
Supplies: (and links where possible)
I have listed which products I have used, and where they may be purchased. It’s a huge marketplace and in most instances, there are multiple sources and many alternatives to choose from.
Stencil: Mid Century Tower: A Colorful Life Designs
Waffle Flower Grip Mat, 8.5 x 6.5, Scrapbook.com
Versamark Embossing Ink: Simon Says Stamp
Stamps: Impression Obsession (no longer in business)
Dies: Deckled Rectangles , Stampin’ Up! (retired)
Ink: Stampin’ Up!
Blending Brushes: Stampin’ Up!
Versafine Onyx, Simon Says Stamp
Memento Ink: Stampin’ Up!
Alcohol Markers:
Stampin’ Blends: Stampin’ Up!
Copics: Wallacks
Adhesive: Tombow Aqua, Michaels
Card Base & Card Face: Accent 100 lb., Amazon
Do you have comments or thoughts to share on this design? Drop me a line in the Comments Section below – I’d love to hear from you!
You can also use the Comments Section to be added to the list, and notified when I release new work.
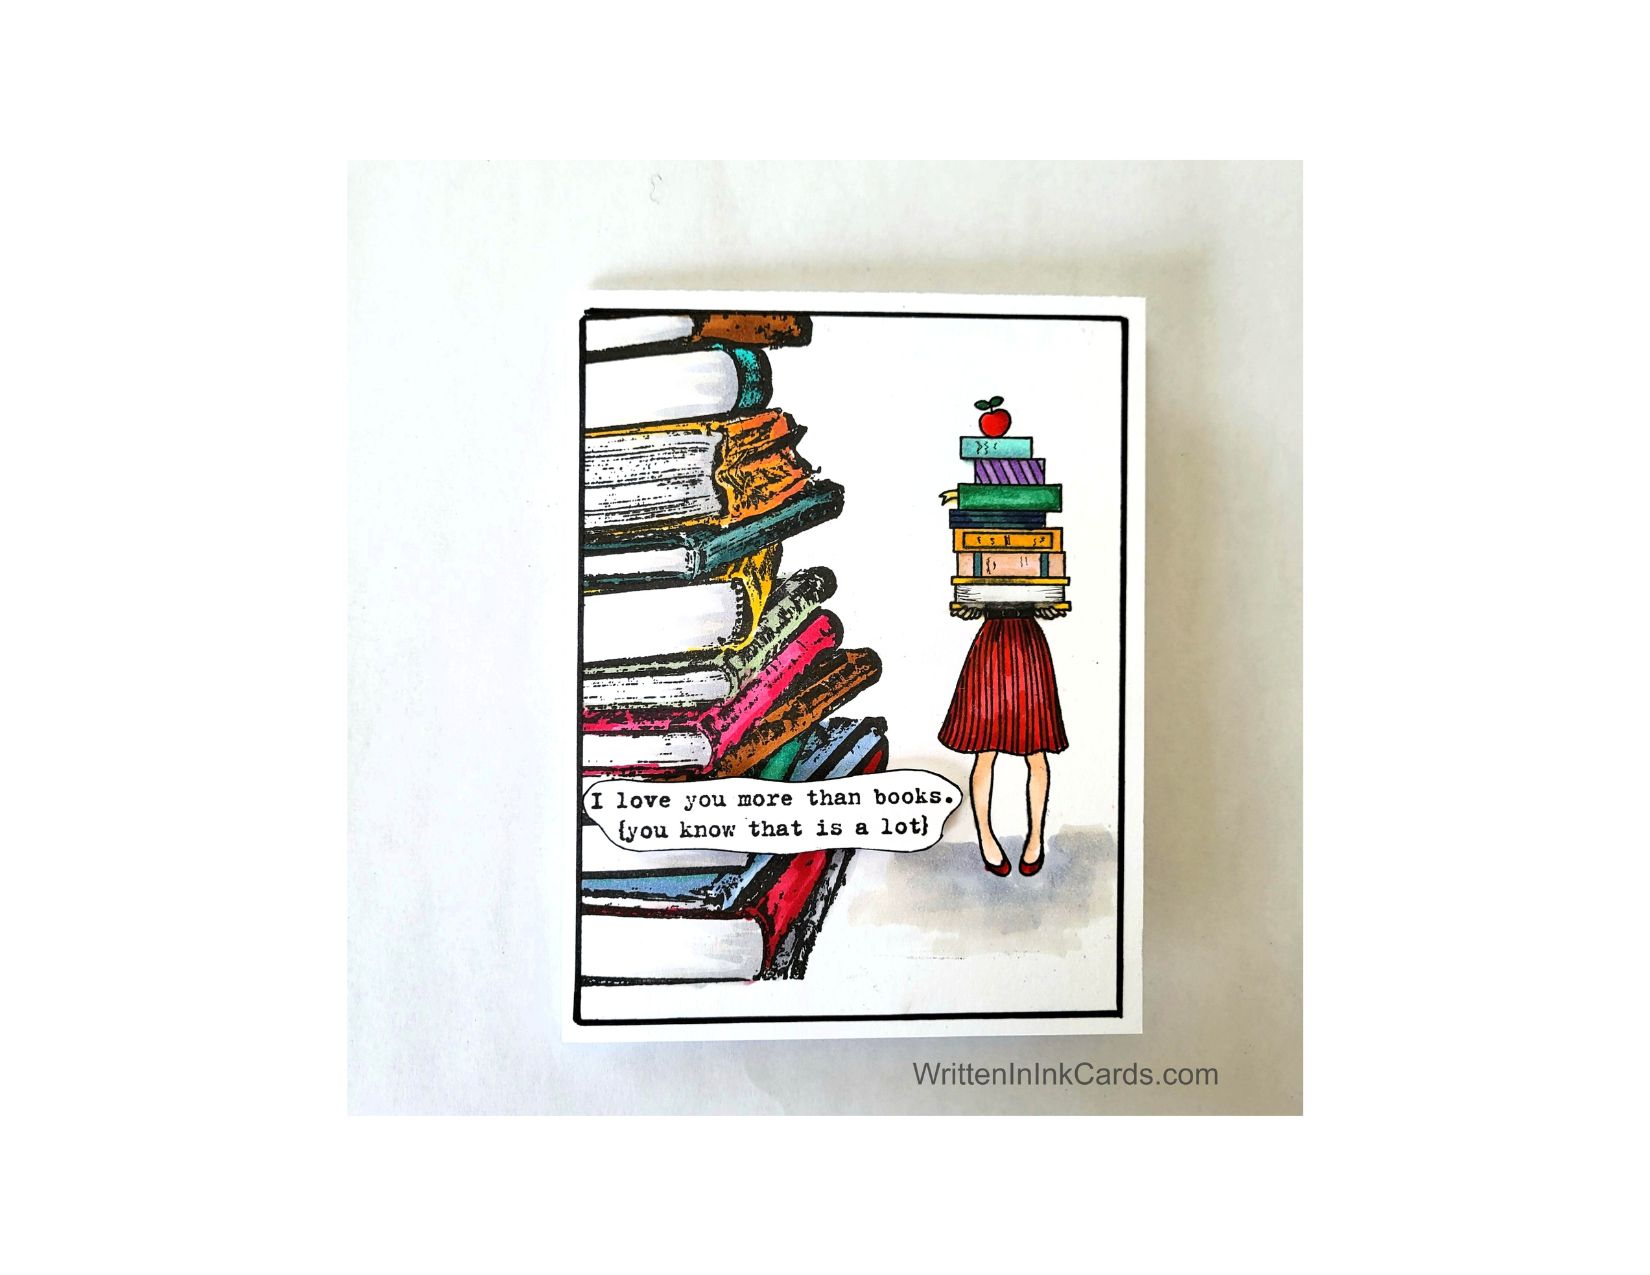
A Handmade Card for the Bibliophile in Your Life

Let’s get Started:
Card Base: 5.5 x 8.5, scored and folded at 4.25
Card Face: 5.25 x 4
I have to confess that I love books: I love hard cover, soft cover, e-reader: I just love reading and stepping into another world. How about you?
Card Face:
- I put the card face into my stamp positioner and stamped the books with black Memento ink. (This ink is alcohol resistant, so it is perfect for working with alcohol markers.)
- Then I removed that stamp and added the stamps for the girl and stamped her, also with Memento.
- Finally, I coloured both images with alcohol markers, adding a bit of shadow under the girl to ground her in the scene.
Other:
- I stamped the sentiment with Versafine Onyx.
- After giving it a minute to dry (pigment inks take longer to dry) I fussy cut around the sentiment.
Assembly
- I glued the card face to the card base.
- I added the sentiment as shown.
- Then I decided that the card needed a little more definition: I grabbed a black marker and used a ruler to create a black border around the card face.
There are several advantages to this –
– It saves a piece of card stock to be used another day
– No need to sacrifice a portion of the card face if you’re happy with the proportions
– Or – as in this case – if you see the need for more definition, but too late in the process to add another layer.
Final Thoughts:
The combination of these images makes me think of art you find in a graphic novel. Such a fun and unexpected result. ( Did I mention that I love books?)
Supplies: (and links where possible)
I have listed which products I have used, and where they may be purchased. It’s a huge marketplace and in most instances, there are multiple sources and many alternatives to choose from.
Waffle Flower Grip Mat, 8.5 x 6.5, Scrapbook.com
Versamark Embossing Ink: Simon Says Stamp
Stamps:
Stack of Books, Technique Junkies (no longer available)
Hand Delivered, Stampin’ Up! (retired)
Versafine Onyx, Simon Says Stamp
Memento Ink: Stampin’ Up!
Alcohol Markers:
Stampin’ Blends: Stampin’ Up!
Copics: Wallacks
Adhesive: Tombow Aqua, Michaels
Card Base & Card Face: Accent 100 lb., Amazon
Do you have comments or thoughts to share on this design? Drop me a line in the Comments Section below – I’d love to hear from you!
You can also use the Comments Section to be added to the list, and notified when I release new work.
An easy creative solution to a BIG cardmaking Blunder

What to do when you’ve invested time and materials, but then it all goes sideways? When that happens to me I hate having to scrap the time and materials invested in the piece.
Errors are opportunities for creativity! Read on to learn more ….
Let’s get Started:
Card Base: 5.5 x 8.5, scored and folded at 4.25
Border Layer: 5.5 x 4.25
Card Face: 5.5 x 4
Card Face:
I stamped the images in black Memento ink and colored them with alcohol markers. I was happy with the result, as coloring isn’t my strong suit.
Then I put this aside for a period of time, trying to decide how to finish the piece. When I picked it back up again I was dismayed to see that it had been sitting too close to something messy – there was a fine blue spatter in the upper right. (Probably from cleaning a stencil, and simple carelessness with my work!). How to salvage the time and materials…. ???
I added both large and small drops of paint above the brush. I used a fine liner to outline the drops and a blue alcohol marker to fill them in. I also added small dots of blue marker here and there to bridge between the fine spatter and the larger drops. It worked – I was delighted with the result, I had successfully camouflaged my error!
I carried this one step further by creating puddles of paint under the brush. (There were puddles around the paint pot, but not under this paintbrush).
I used a white gel pen to add accents here and there in the scene.
I put the card face into my stamp positioner and added the sentiment.
I cut the card face into three panels, 1 ⅓” each.
Assembly
I glued the border layer to the card base.
I glued the three pieces of the card face onto this, spacing evenly.
Final Thoughts:
I love Anita Jeram’s work, and was so happy with the images as placed and coloured. (I don’t pretend to be an expert with any form of colouring, so when I get something that I’m satisfied with, I’m happy!).
Then I was dismayed to notice the spatter, and finally, happy again when the problem was resolved.
Happy – dismayed – happy. Sounds like a movie theme! 😆
Of course if you want to avoid the need for a rescue operation, putting the card in a safe spot is definitely the way to go.
Supplies: (and links where possible)
I have listed which products I have used, and where they may be purchased. It’s a huge marketplace; in most instances, there are multiple sources and many alternatives.
Stamps: Paint the Town, Colorado Craft Co.,
Versafine Onyx, Simon Says Stamp
Memento Ink: Stampin’ Up!
Alcohol Markers:
Stampin’ Blends: Stampin’ Up!
Copics: Wallacks
Fineliners: Amazon
White Gel Pen: Arteza, Amazon
Adhesive: Tombow Aqua, Michaels
Card Base & Card Face: Accent 100 lb., Amazon
Say Happy Easter with a Fabulous, Sparkly Bunny Card


Would you like to experiment with a design like this? You’ll find a supply list below, including a link to the stencil I used from A Colorful Life Designs. Follow the link and use discount code ChrisFan10 to save 10% on your entire order! (Master Creator Bundles are excluded as they already have a 20% discount built in.)
Easter is typically visualized in happy springtime pastels. But sometimes a sparkly Easter bunny fits the bill!
Let’s get Started:
Card Base: 5.5 x 8.5, scored and folded at 4.25
Green Border Layer: 4.25 x 4.25
Card Face: 4 x 4
Card Face:
- I positioned the stencil on the card face, securing it with Mint Tape.
- Next, using a palette knife, I added sparkly white embossing paste over all exposed areas. I removed the stencil, being careful not to smudge the design.
- Afterwards, I placed the stencil in water and put the card face aside to dry.
Other:
- I stamped the sentiment and used a tiny die to cut it out.
- I also stamped the tiny heart with green ink, added embossing ink with a pen, sprinkled it with holographic powder and set it with a heat gun. I used a punch to cut it out.
- Once the card face was dry I used a pokey tool to create holes on either side of the bunny’s neck. I threaded fine iridescent white yarn through the holes and secured this on the back with tape.
Assembly
- I glued the card face to the green border layer, centering on all sides.
- Following that, I added this to the card base, aligning to the left-hand edge, and leaving a white border on the right.
- I used metallic thread to attach the heart tag to the bunny’s collar.
- I added the sentiment to the upper left of the card.
- The finishing touch was the addition of three small green gems down the right-hand border.
Final Thoughts:
The sparkly Easter Bunny is really pretty: I didn’t want to add anything to compete with that, so I chose very soft green accents. I’m really happy with the end result.
Supplies: (and links where possible)
I have listed which products I have used, and where they may be purchased. It’s a huge marketplace and in most instances, there are multiple sources and many alternatives to choose from.
Stencil: Heart Bunny, A Colorful Life Designs
Embossing Pen: Ranger, Amazon
Holographic Embossing Powder: Ranger, Amazon
Ink: Stampin’ Up!
Embossing Paste: Stampin’ Up!
Adhesive: Tombow Aqua, Michaels
Card Base & Card Face: Accent 100 lb., Amazon
Do you have comments or thoughts to share on this design? Drop me a line in the Comments Section below – I’d love to hear from you!
You can also use the Comments Section to be added to the list, and notified when I release new work.
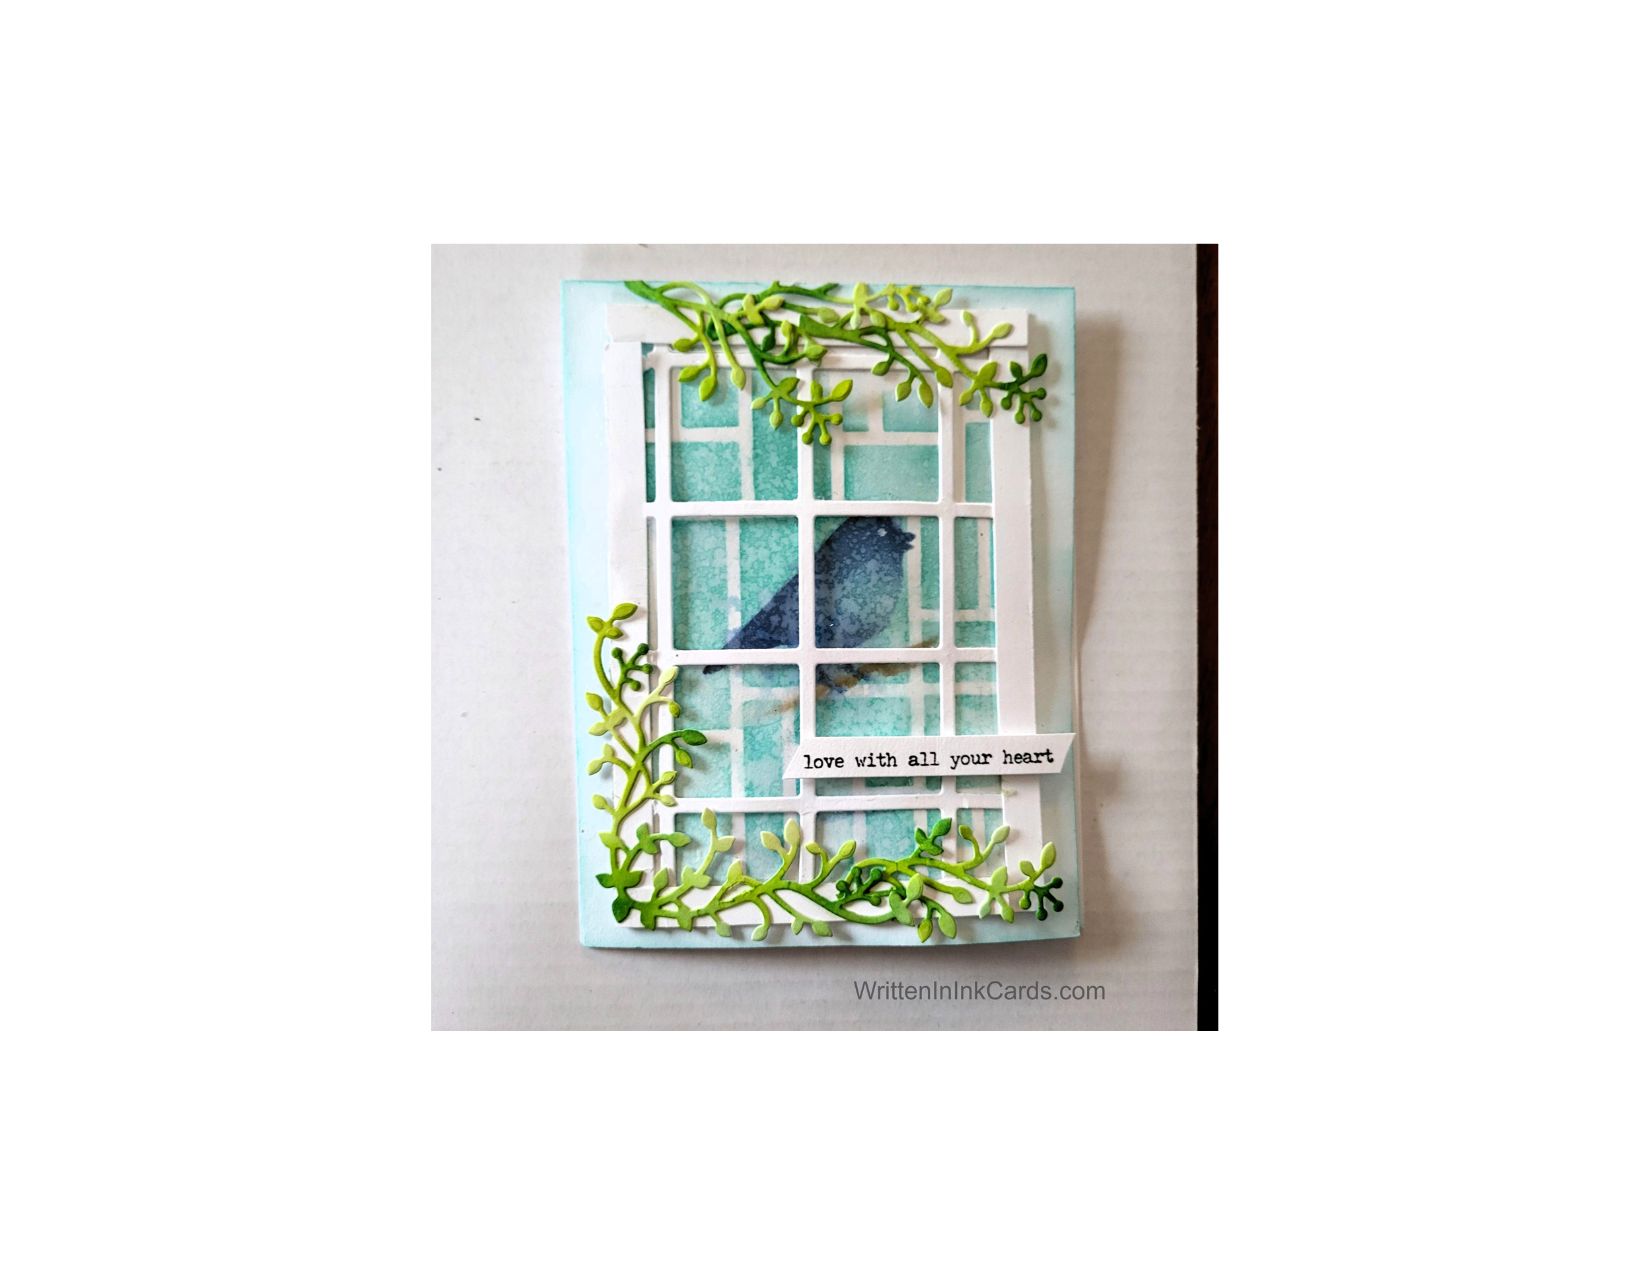
Create a card that Celebrates Singing After the Storm

Would you like to experiment with a design like this? You’ll find a supply list below, including a link to the stencils I used from A Colorful Life Designs. Follow the link and use discount code ChrisFan10 to save 10% on your entire order! (Master Creator Bundles are excluded as they already have a 20% discount built in.)
Let’s get Started:
Card Base: 5.5 x 8.5, scored and folded at 4.25
Border Layer: 5 x 3.75
Card Face: 5 x 3.75
White Cardstock to create window panels and window frame.
Acetate: 5 x 3.75
Card Face:
- I laid the card face onto the Grip Mat and positioned the MultiShadow stencil. I applied teal ink with a light hand.
- After removing this stencil, I positioned the Message Bird stencil, using a dark blue ink for the bird. I repositioned the stencil and added the branch with brown ink.
- Setting both stencils aside, I lightly spritzed water onto the card face to soften the lines and add depth.
Other:
- I used a “plaid” die to create the window panes.
- I didn’t have a rectangular die in the correct size to create the window frame: to get around this I cut 4 pieces of card stock, each ¼” wide and 5” long.
- I used a couple of dies to cut the foliage for the window and then brushed on a couple of different green inks.
- I brushed teal ink around all borders of the card base, allowing it to fade as it moved away from the edges.
- I found a great sentiment in my binder, ready and just waiting to be put to use.
Assembly
- I glued the card face to the card base, centering on all sides.
- I secured the acetate to the back of the window pane die cut and then secured this to the card face.
- I added the strips of cardstock to the outer edges of this, trimming to the correct size.
- I glued the foliage to the window as shown.
- I added the sentiment.
Final Thoughts:
I wanted to include acetate behind the window for the realistic shine it would provide: securing this to the card face and then the window proved very difficult and I would not include it another time.
I wanted the scene to have the look of being viewed through a window during a rainstorm, and I think I succeeded!
Supplies: (and links where possible)
I have listed which products I have used, and where they may be purchased. It’s a huge marketplace and in most instances, there are multiple sources and many alternatives to choose from.
Stencils:
MultiShadow , a Colorful Life Designs
Message Bird, A Colorful Life Designs
Waffle Flower Grip Mat, 8.5 x 6.5, Scrapbook.com
Ink: Stampin’ Up!
Blending Brushes: Stampin’ Up!
Versafine Onyx, Simon Says Stamp
Adhesive: Tombow Aqua, Michaels
Card Base & Card Face: Accent 100 lb., Amazon
Do you have comments or thoughts to share on this design? Drop me a line in the Comments Section below – I’d love to hear from you!
You can also use the Comments Section to be added to the list, and notified when I release new work.
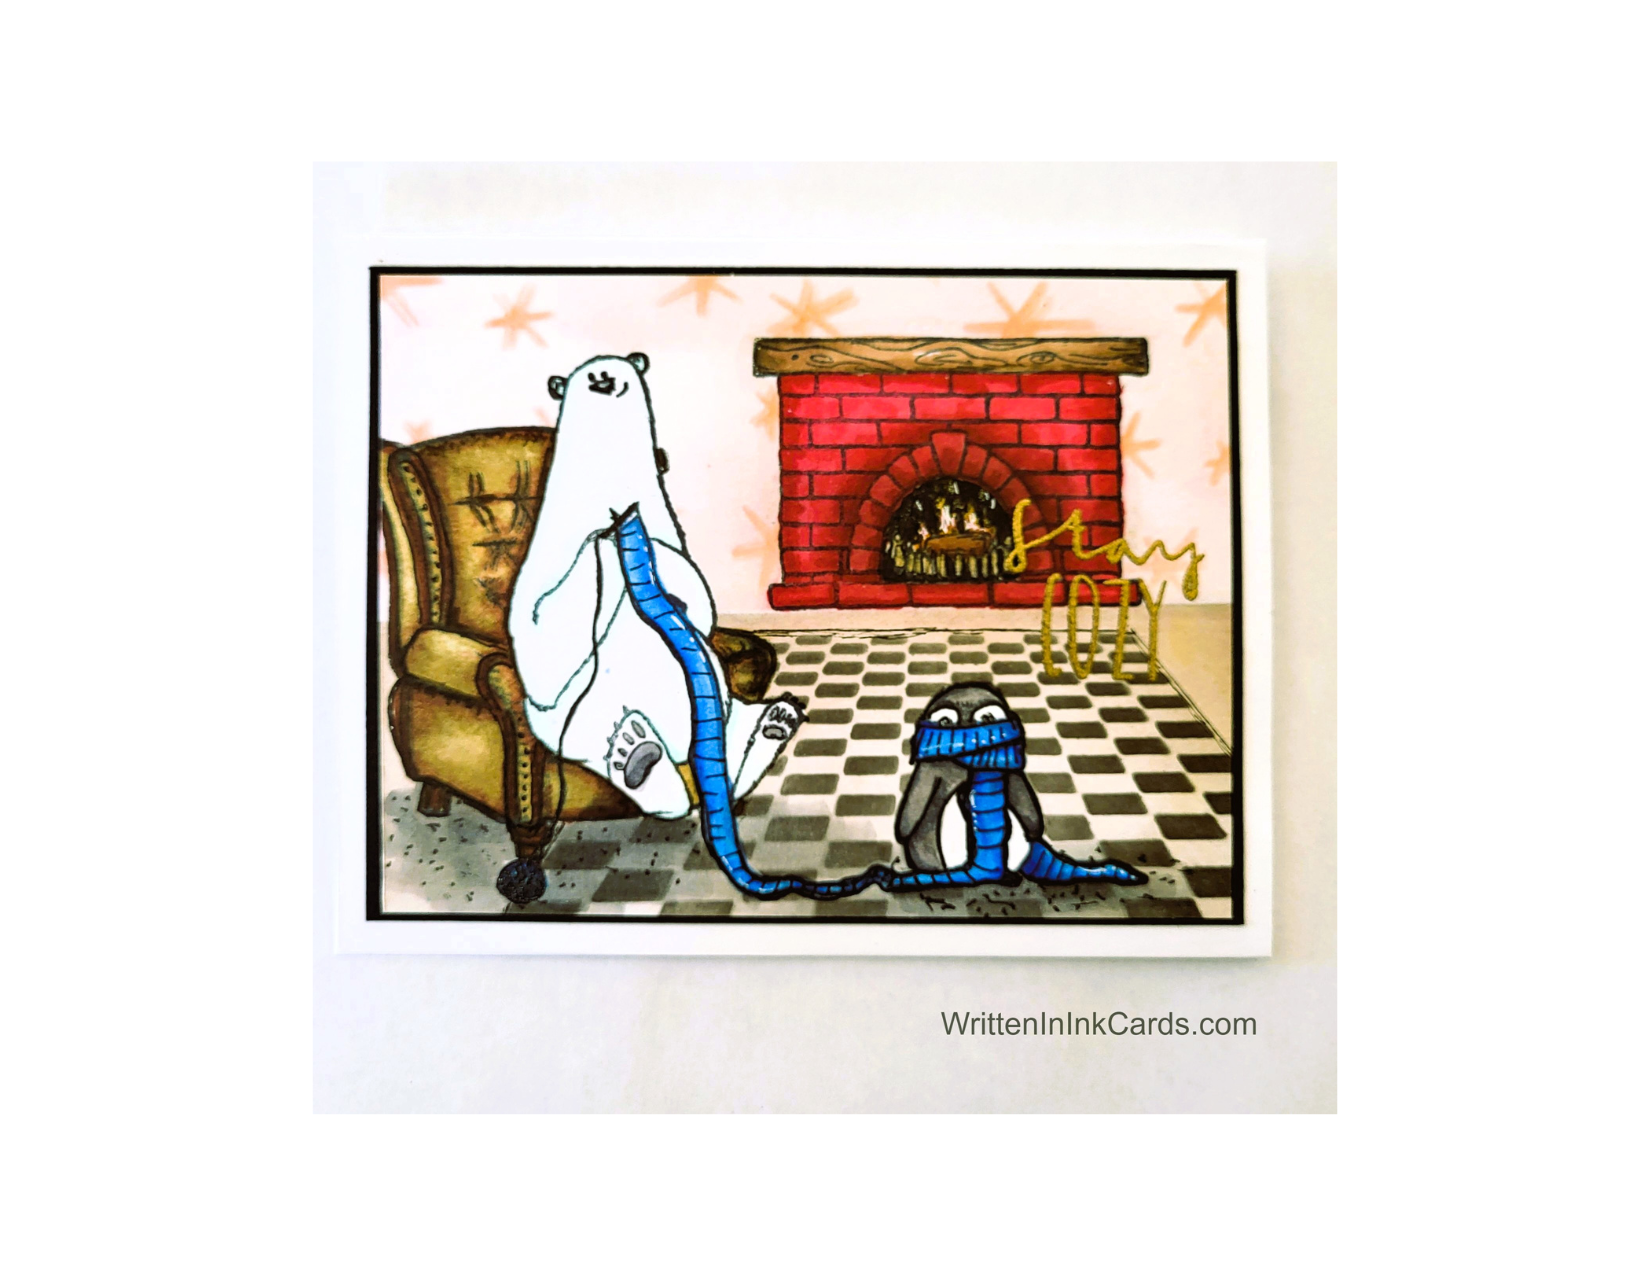
Creative & Cozy Card Making: Share a Smile Today!

Would you like to experiment with a design like this? Below, you’ll find a supply list, including a link to the stencils I used from A Colorful Life Designs. Follow the link and use discount code ChrisFan10 to save 10% on your entire order! (Master Creator Bundles are excluded as they already have a 20% discount built in.)
Let’s get Started:
Card Base: 5.5 x 8.5, scored and folded at 4.25
Border Layer: 5.25 x 4
Card Face: 5 ⅛ x 3 7/8
Baby it’s cold outside! Stay cozy.
Card Face:
- I stamped the fireplace, chair, and bear + penguin onto masking paper and cut them out.
- Next, the fireplace and bear + penguin were stamped onto the card face, using Memento Ink.
- I put the mask in place over the bear/penguin image and then stamped the chair.
This created the effect of the bear sitting in the chair without any portions of the two images interfering with each other.
- I coloured each of the images with alcohol markers. I used a gold gel pen to colour the andirons in the fireplace; I also used a black fine liner to colour around the flames so they would have more presence.
- I put the masks in place on all three images before putting the stencil in place to create the area rug on the floor. I added black ink to the exposed areas to create the checkered pattern.
- I used the Sparkles stencil to create the wallpaper, using a soft hand and orange ink.
- I added a shadow under the chair and penguin, as well as towards the junction of the floor and wall.
- I decided on a couple of final touches – I used white gel pen here and there on the scarf as well as on the flames in the fireplace.
- I put the card face into my stamp positioner and stamped the sentiment with Versamark embossing ink before adding gold embossing powder and setting it with my heat gun.
Assembly
- I glued the black border layer to the card base and then added the card face on top of these, centering both carefully.
Final Thoughts:
I was really happy with this whimsical scene when it was completed. Looking at it now I would make the shadows around the fireplace and where the floor meets the wall a bit darker and more apparent, but overall I’m satisfied.
Supplies: (and links where possible)
I have listed which products I have used, and where they may be purchased. It’s a huge marketplace; in most instances, there are multiple sources and many alternatives.
Stencils: Floor Perspective, A Colorful Life Designs
Sparkles: A Colorful Life Designs
Waffle Flower Grip Mat, 8.5 x 6.5, Scrapbook.com
Versamark Embossing Ink: Simon Says Stamp
Gold Embossing Powder: Wow, Simon Says Stamp
Stamps: Knitting Bear, Colorado Craft Company
Cozy Greetings, Unity Stamps
Ink: Stampin’ Up!
Blending Brushes: Stampin’ Up!
White Gel Pens: Arteza, Amazon
Fine Liners: Amazon
Memento Ink: Stampin’ Up!
Alcohol Markers:
Stampin’ Blends: Stampin’ Up!
Copics: Wallacks
Adhesive: Tombow Aqua, Michaels
Card Base & Card Face: Accent 100 lb., Amazon
How to Rescue Your Card Designs from Mistakes

If you’re new, or experienced, or anything like me (!) you have run into situations where you need to rescue your card from a blunder.
Let’s get Started:
Card Base: 5.5 x 8.5, scored and folded at 4.25
Border Layer: 5.5 x 4.25
Card Face: 5.5 x 4
Card Face:
I stamped the images in black Momento ink and coloured them with alcohol markers.
Then I put this aside for a period of time, trying to decide how to finish the piece. When I picked it back up again I realized it had been sitting too close to something messy – there was a fine blue spatter in the upper right. (Probably from cleaning a stencil, and simple carelessness with my work!). How to salvage the time and materials…. ???
I added both large and small drops of paint above the brush. I used a fine liner to outline the drops and a blue alcohol marker to fill them in. I also added small dots of blue marker here and there to bridge between the fine spatter and the larger drops. It worked – I had successfully camouflaged my error!
I carried this one step further by creating puddles of paint under the brush. (There were puddles around the paint pot, but not under this paintbrush).
I used a white gel pen to add accents here and there in the scene.
I put the card face into my stamp positioner and added the sentiment.
I cut the card face into three panels, 1 ⅓” each.
Assembly
I glued the border layer to the card base.
I glued the three pieces of the card face onto this, spacing evenly.
Final Thoughts:
I love Anita Jeram’s work, and was so happy with the images as placed and coloured. (I don’t pretend to be an expert with any form of colouring, so when I get something that I’m satisfied with, I’m happy!).
Then I was dismayed to notice the spatter, and finally, happy again when the problem was resolved.
Happy – dismayed – happy. Sounds like a movie theme!
I’m so happy that I decided to rescue this card.😆
Supplies: (and links where possible)
I have listed which products I have used, and where they may be purchased. It’s a huge marketplace; in most instances, there are multiple sources and many alternatives.
Stamps: Paint the Town, Colorado Craft Co.,
Versafine Onyx, Simon Says Stamp
Memento Ink: Stampin’ Up!
Alcohol Markers:
Stampin’ Blends: Stampin’ Up!
Copics: Wallacks
Fineliners: Amazon
White Gel Pen: Arteza, Amazon
Adhesive: Tombow Aqua, Michaels
Card Base & Card Face: Accent 100 lb., Amazon
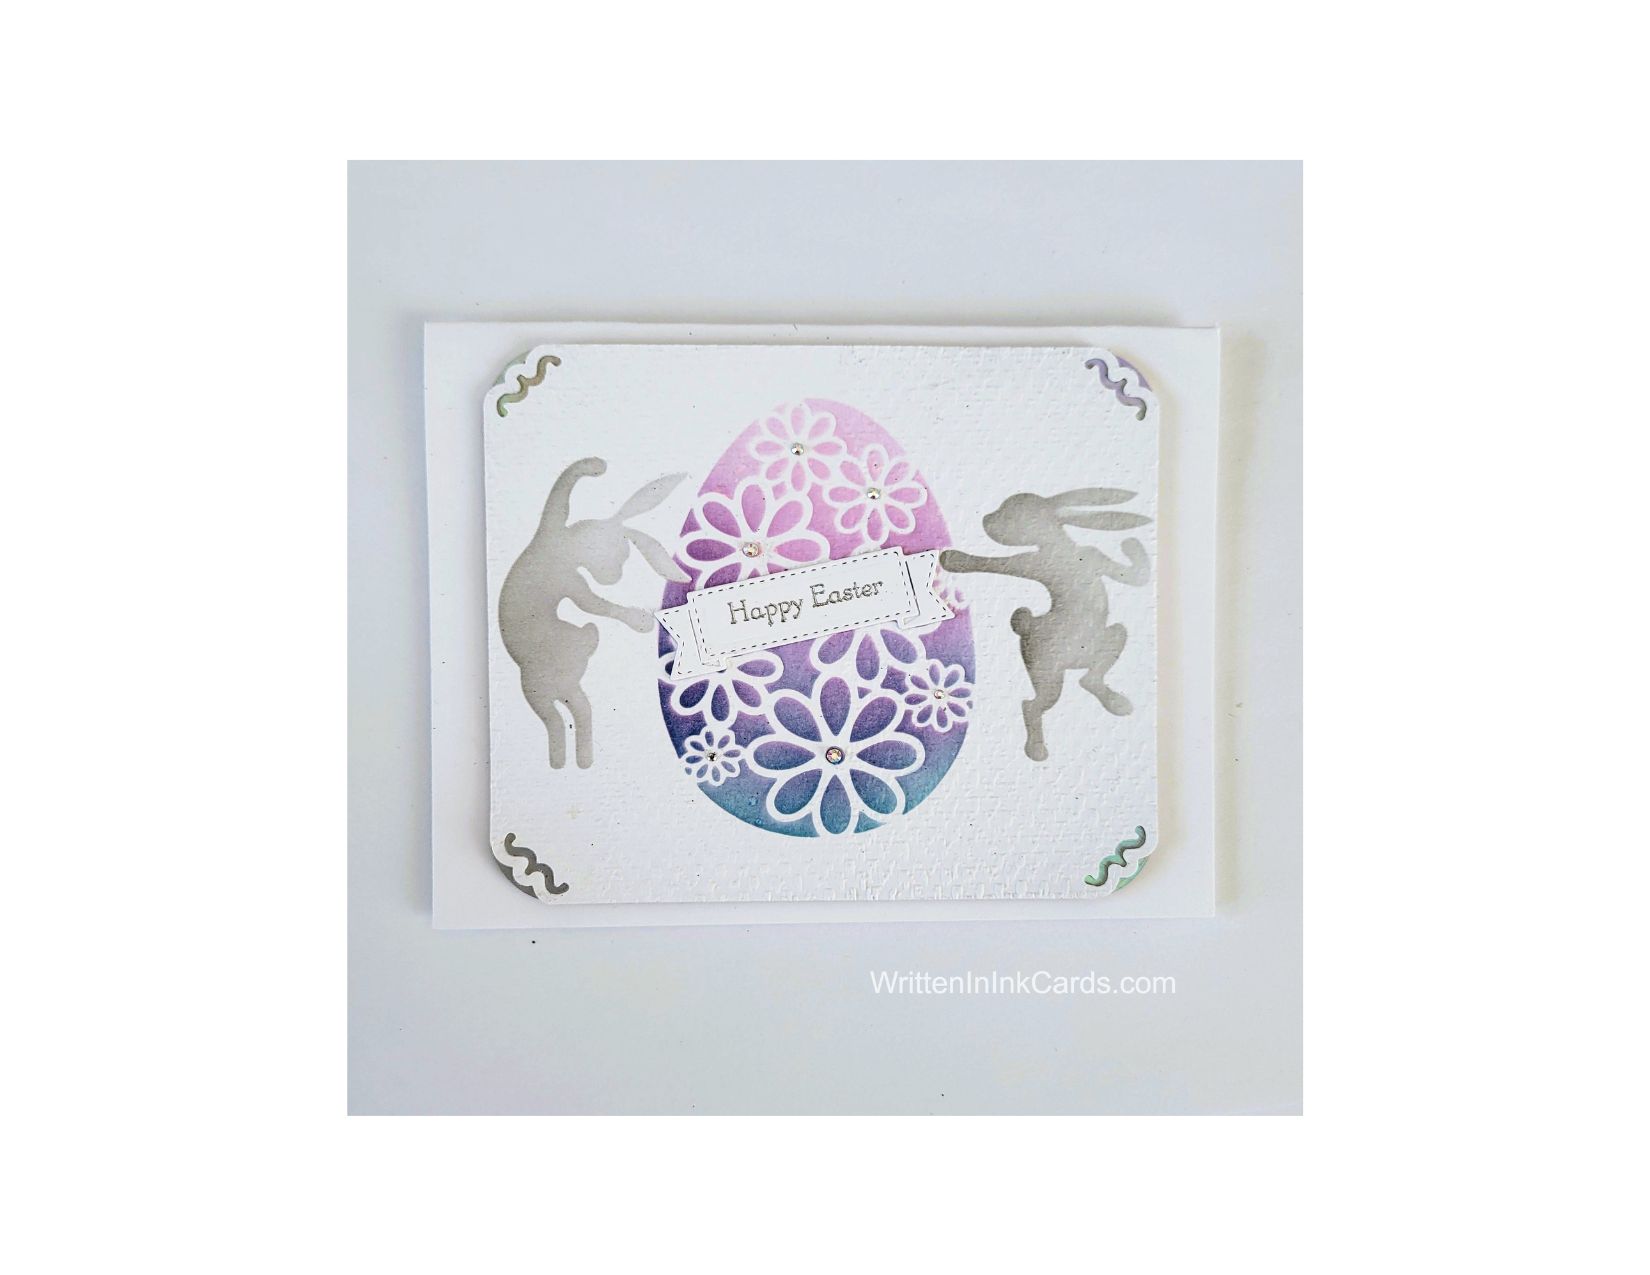
Say I love you with a whimsical handmade Easter card

Would you like to experiment with a design like this? You’ll find a supply list below, including a link to the stencils I used from A Colorful Life Designs. Follow the link and use discount code ChrisFan10 to save 10% on your entire order! (Master Creator Bundles are excluded as they already have a 20% discount built in.)
Easter means bunnies, chocolate, and celebrating traditions created over the years. Sending a card is a wonderful way to send a hug to someone you can’t be with.
Let’s get Started:
Card Base: 5.5 x 8.5, scored and folded at 4.25
Border Layer: 5 x 4
Card Face: 5 x 4
Card Face:
- After laying the card face on my Grip Mat, I positioned the Easter egg stencil.
- I applied blue ink to the bottom and pink ink to the top, going back and forth between the two colours until I got a smooth blend where they met.
- After removing that stencil, I positioned the bunny stencil so that the bunny on the right was in the correct position.
- I masked off all necessary areas around the bunny and applied gray ink across the exposed surface.
- I repositioned the stencil to place the bunny on the left in the right spot, and again added gray ink after masking off all necessary areas.
- I used a punch on all four corners of the card face to create the peek-through design.
Other:
- Using a scrap piece of cardstock, I stamped the Happy Easter sentiment with Versamark embossing ink.
- I sprinkled this with silver embossing powder and set it with my heat gun.
- I ran this through my Big Shot and cut it down with a small banner die.
- I applied gray ink to the corners of the border layer. (This ensured a match to the bunnies on the card face, and was more economical than using a piece of cardstock.)
Assembly
- I put dimensional foam on the back of the border layer, and then glued the card face on top of this, allowing the gray ink to show through the punched-out design.
- I centered this on the card base.
- I glued the banner on top of the Easter egg, in between the bunnies’ hands.
- I added tiny rhinestones to the center of the flowers on the Easter egg.
Final Thoughts:
I love these two stencils together: I’ve been eyeing the Bunny Dance stencil for a while now, and I’m so happy that I got it.
Supplies: (and links where possible)
I have listed which products I have used, and where they may be purchased. It’s a huge marketplace and in most instances, there are multiple sources and many alternatives to choose from.
Stencils:
Cute Easter Egg: A Colorful Life Designs
Bunny Dance, A Colorful Life Designs
Waffle Flower Grip Mat: Scrapbook.com
Versamark Embossing Ink: Simon Says Stamp
Silver Embossing Powder: Hero Arts, Simon Says Stamp
Ink: Stampin’ Up!
Blending Brushes: Stampin’ Up!
Adhesive: Tombow Aqua: Michaels
Card Base & Card Face: Accent 100 lb., Amazon
Do you have comments or thoughts to share on this design? Drop me a line in the Comments Section below – I’d love to hear from you!
You can also use the Comments Section to be added to the Notification list, and be contacted when I release new work.
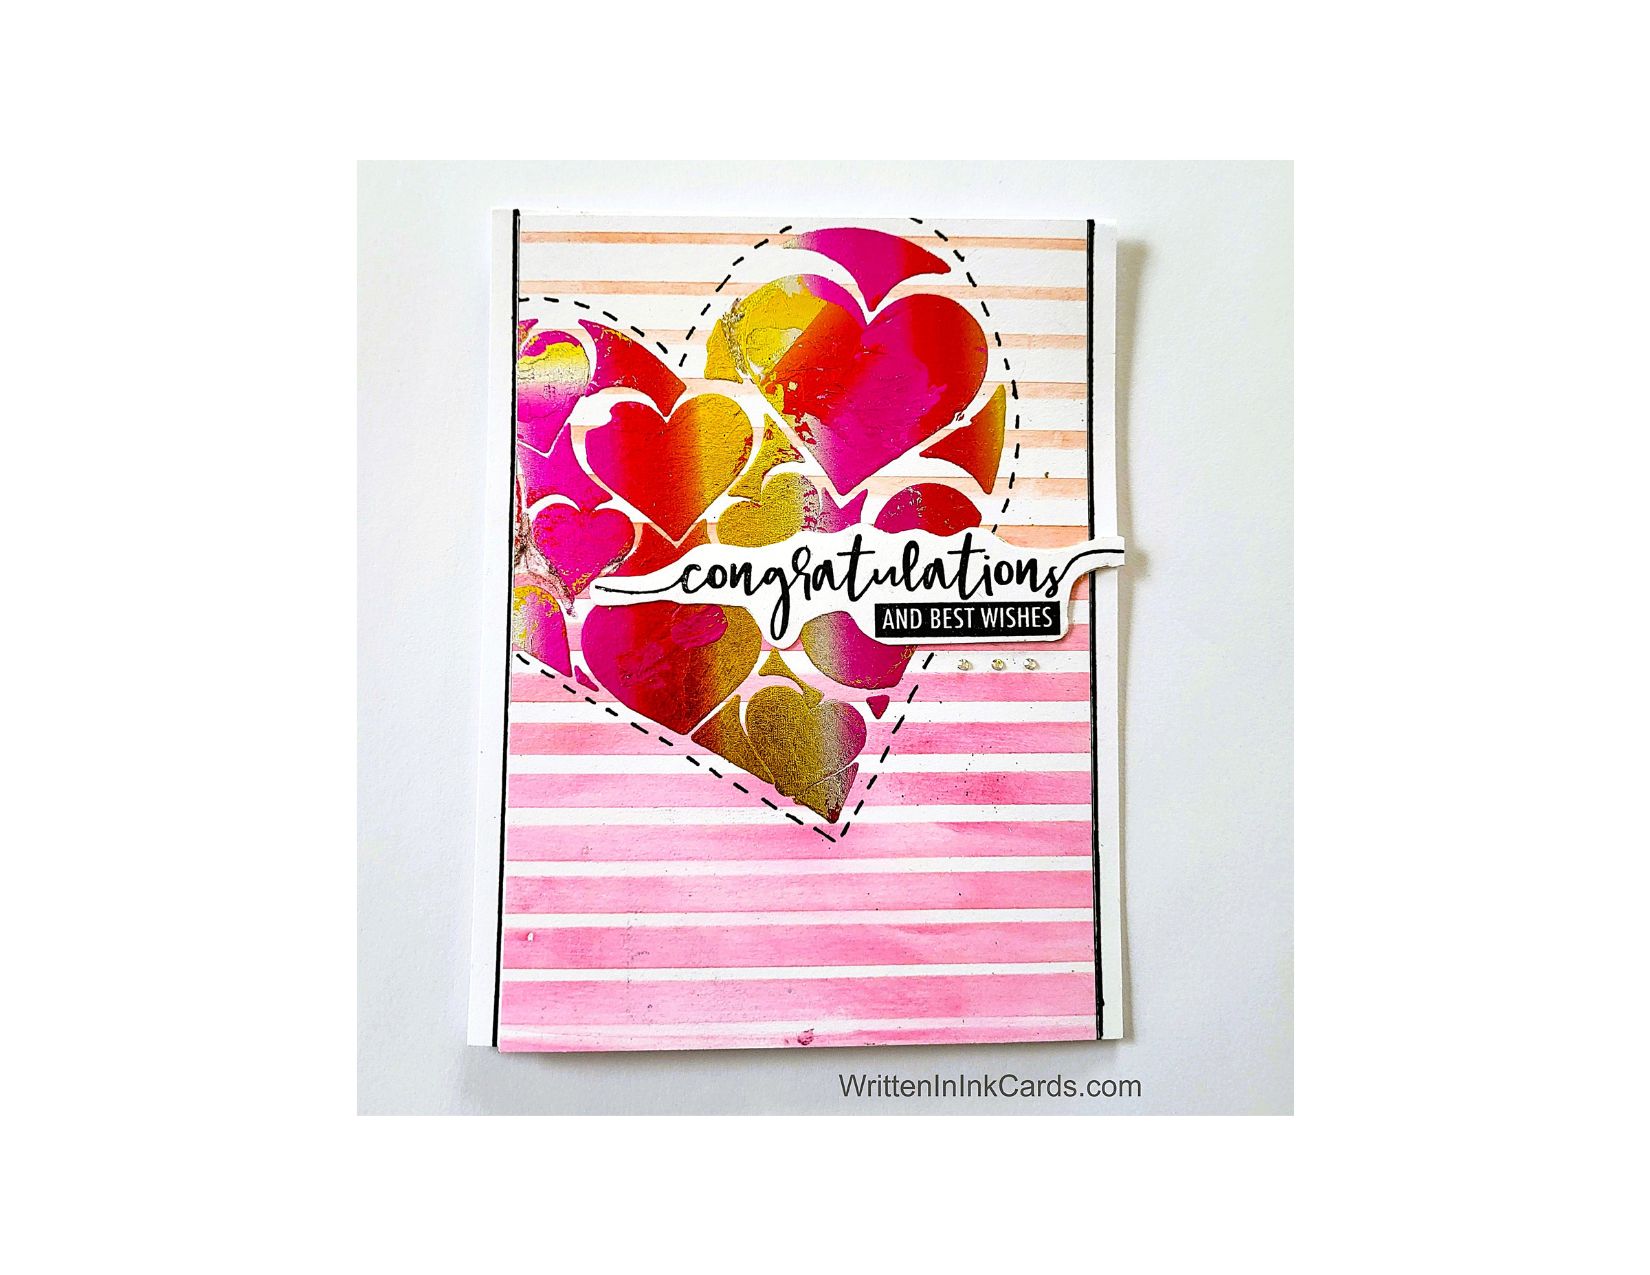
Master Card Making with Simple Innovative Stenciling Techniques

Would you like to experiment with a design like this? Below, you’ll find a supply list, including a link to the stencils I used from A Colorful Life Designs. Follow the link and use the discount code ChrisFan10 to save 10% on your entire order! (Master Creator Bundles are excluded as they already have a 20% discount built in.)
Mixing media and techniques can create stunning results – read more below for a how-to.
Let’s get Started:
Card Base: 4.25 x 11, scored and folded at 5.5
Card Face: 4 x 5.25
Card Face:
- I placed my card face on the Grip Mat.
- I sprayed the back of the Graduated Lines stencil with Pixie spray and waited for about 30 seconds before positioning it on the card face. (The longer, unattached lines of this stencil may shift if not secured.)
- I applied intense pink ink across the bottom of the stencil and then shifted to a softer orange colour before setting this stencil aside.
- I took the Heart of Hearts stencil and scrap copy paper. I traced around the outer edges of the heart where I could. Once I removed the stencil, I joined the gaps to create a complete heart. I then carefully cut it out with an Xacto knife, leaving the borders intact.
- I removed the card face from the Grip Mat and placed it on scrap paper. I positioned the stencil on the card face, securing it with mint tape.
- I laid the scrap paper over the stencil, lining up the cut out opening carefully: the remainder of the scrap paper became a mask.
- I applied Duo Gel to all open areas on the stencil.
- After carefully removing the stencil and putting it in water, I set the card face aside to dry.
- Once dry I laid a piece of transfer foil (previously cut to size) over the now-sticky gel, and ran the card face through the Big Shot.
- When I removed the foil, the Duo Gel held onto the foil, causing the stencilled pattern to remain.
- I added dashes around the outside of the heart, about ⅛” away from the foiling.
Other:
- I stamped the sentiment with Versafine Onyx ink, immediately sprinkled on clear embossing powder and set it with my heat gun.
Versafine Onyx is a pigment ink, which stays wet long enough to allow heat embossing.
- I fussy cut the around sentiment and put dimensional foam on the back.
Assembly
- I glued the card face to the card base, centering vertically.
- I added the sentiment to the card face.
- I added small dashes under the sentiment, echoing those around the heart.
- I used a black marker and a ruler to create the look of a fine black border beside the card face.
Final Thoughts:
I really like the combination of the two stencils – they work so well together. I had initially tried to heat emboss the sentiment to create a flat card, but it was too muted on top of the foil. I solved it by heat embossing the sentiment on white and fussy cutting around it, then lining it up directly over the dud sentiment.
Supplies: (and links where possible)
I have listed which products I have used, and where they may be purchased. It’s a huge marketplace; in most instances, there are multiple sources and many alternatives.
Stencils:
Graduated Lines, A Colorful Life Designs
Heart of Hearts, A Colorful Life Designs
Waffle Flower Grip Mat, 8.5 x 6.5, Scrapbook.com
Versamark Embossing Ink: Simon Says Stamp
Stamps: Loads of Wishes, Avery Elle, Amazon
Fine Liners: Amazon
Ink: Stampin’ Up!
Blending Brushes: Stampin’ Up!
Versafine Onyx, Simon Says Stamp
Clear Embossing Powder: Wow, Simon Says Stamp
Duo Gel: Therm O Web, Simon Says Stamp
Transfer Foil: Summer Rainbow, Therm O Web, Amazon
Adhesive: Tombow Aqua, Michaels
Card Base & Card Face: Accent 100 lb., Amazon
Do you have comments or thoughts to share on this design? Drop me a line in the Contact section in the header – I’d love to hear from you!
Before you go – use the Notifications box (below) to be notified when I release new work.