Your cart is currently empty!
Master Card Making with Simple Innovative Stenciling Techniques

Would you like to experiment with a design like this? Below, you’ll find a supply list, including a link to the stencils I used from A Colorful Life Designs. Follow the link and use the discount code ChrisFan10 to save 10% on your entire order! (Master Creator Bundles are excluded as they already have a 20% discount built in.)
Mixing media and techniques can create stunning results – read more below for a how-to.
Let’s get Started:
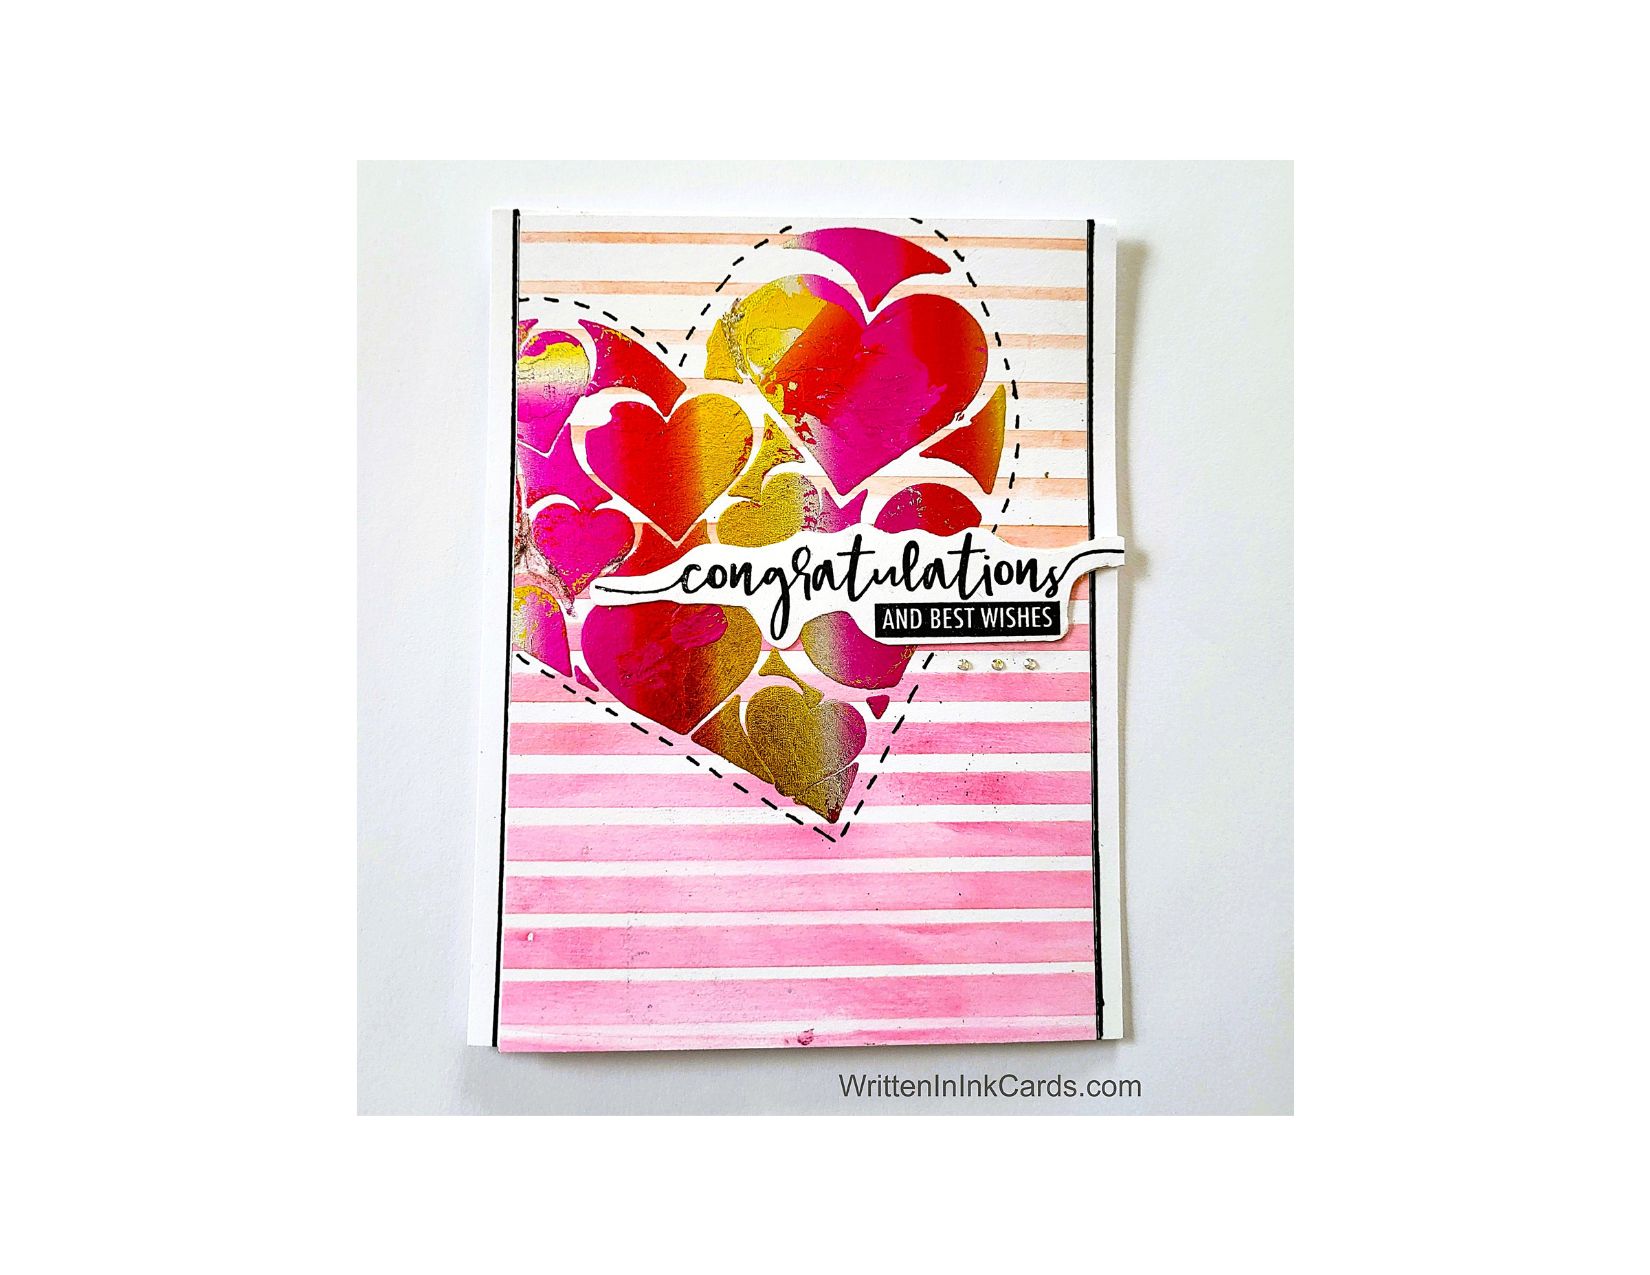
Card Base: 4.25 x 11, scored and folded at 5.5
Card Face: 4 x 5.25
Card Face:
- I placed my card face on the Grip Mat.
- I sprayed the back of the Graduated Lines stencil with Pixie spray and waited for about 30 seconds before positioning it on the card face. (The longer, unattached lines of this stencil may shift if not secured.)
- I applied intense pink ink across the bottom of the stencil and then shifted to a softer orange colour before setting this stencil aside.
- I took the Heart of Hearts stencil and scrap copy paper. I traced around the outer edges of the heart where I could. Once I removed the stencil, I joined the gaps to create a complete heart. I then carefully cut it out with an Xacto knife, leaving the borders intact.
- I removed the card face from the Grip Mat and placed it on scrap paper. I positioned the stencil on the card face, securing it with mint tape.
- I laid the scrap paper over the stencil, lining up the cut out opening carefully: the remainder of the scrap paper became a mask.
- I applied Duo Gel to all open areas on the stencil.
- After carefully removing the stencil and putting it in water, I set the card face aside to dry.
- Once dry I laid a piece of transfer foil (previously cut to size) over the now-sticky gel, and ran the card face through the Big Shot.
- When I removed the foil, the Duo Gel held onto the foil, causing the stencilled pattern to remain.
- I added dashes around the outside of the heart, about ⅛” away from the foiling.
Other:
- I stamped the sentiment with Versafine Onyx ink, immediately sprinkled on clear embossing powder and set it with my heat gun.
Versafine Onyx is a pigment ink, which stays wet long enough to allow heat embossing.
- I fussy cut the around sentiment and put dimensional foam on the back.
Assembly
- I glued the card face to the card base, centering vertically.
- I added the sentiment to the card face.
- I added small dashes under the sentiment, echoing those around the heart.
- I used a black marker and a ruler to create the look of a fine black border beside the card face.
Final Thoughts:
I really like the combination of the two stencils – they work so well together. I had initially tried to heat emboss the sentiment to create a flat card, but it was too muted on top of the foil. I solved it by heat embossing the sentiment on white and fussy cutting around it, then lining it up directly over the dud sentiment.
Supplies: (and links where possible)
I have listed which products I have used, and where they may be purchased. It’s a huge marketplace; in most instances, there are multiple sources and many alternatives.
Stencils:
Graduated Lines, A Colorful Life Designs
Heart of Hearts, A Colorful Life Designs
Waffle Flower Grip Mat, 8.5 x 6.5, Scrapbook.com
Versamark Embossing Ink: Simon Says Stamp
Stamps: Loads of Wishes, Avery Elle, Amazon
Fine Liners: Amazon
Ink: Stampin’ Up!
Blending Brushes: Stampin’ Up!
Versafine Onyx, Simon Says Stamp
Clear Embossing Powder: Wow, Simon Says Stamp
Duo Gel: Therm O Web, Simon Says Stamp
Transfer Foil: Summer Rainbow, Therm O Web, Amazon
Adhesive: Tombow Aqua, Michaels
Card Base & Card Face: Accent 100 lb., Amazon
Do you have comments or thoughts to share on this design? Drop me a line in the Contact section in the header – I’d love to hear from you!
Before you go – use the Notifications box (below) to be notified when I release new work.