Your cart is currently empty!
Blog
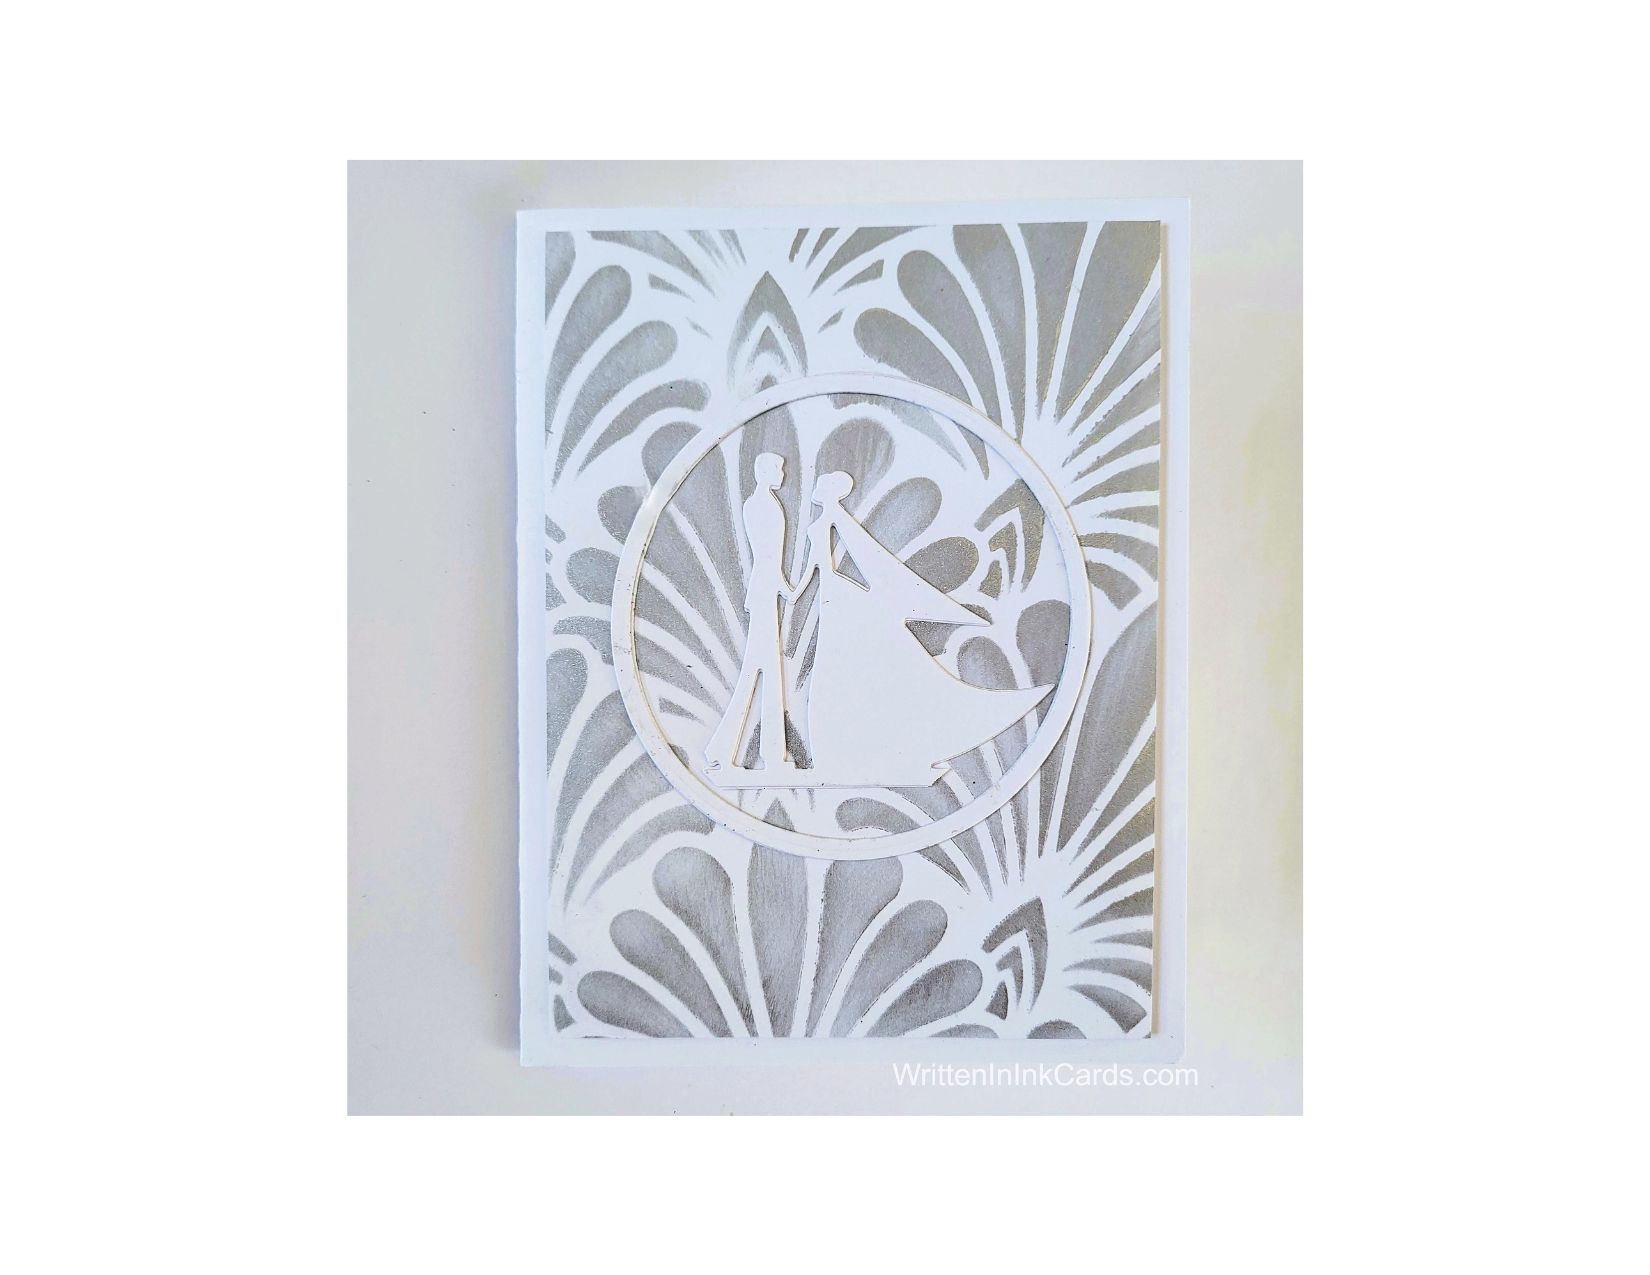
Create a Stunning Wedding Card Using Simple Supplies

Would you like to experiment with a design like this? You’ll find a supply list below, including a link to the stencil I used from A Colorful Life Designs. Follow the link and use discount code ChrisFan10 to save 10% on your entire order! (Master Creator Bundles are excluded as they already have a 20% discount built in.)
Let’s get Started:
Card Base: 4.25 x 11, scored and folded at 5.5
Card Face: 4 x 5.25
An elegant wedding card that is ready in a snap.
Card Face:
- After laying the card face down on my Grip Mat, I positioned the stencil and applied silver pigment ink across the exposed area.
Pigment ink takes longer to dry than dye-based ink: I set this aside for a while to dry.
Other:
- I die cut two of the bridge and groom images. (This is a cover plate die, with a wooded scene around the couple. I simply cut the bride and groom away from the scene – this was easy, because of the way it was constructed.)
- I cut two of the circular frames by securing dies (evenly spaced) on cardstock with Mint Tape and running them through the Big Shot.
Assembly
- Once the ink on the card face was dry I put dimensional foam tape on the back and centered it on the card base.
- I glued both layers of the couple together, as well as both layers of the circular frames.
- I glued the bride and groom to the center of the card face.
- I glued the circular frame to the card face, centering around the couple.
Final Thoughts:
I love the simple elegance of this card; so much so that I decided not to use embellishments.
Initially, I had just the bride and groom on the card. After thinking about it for a bit, I decided that it needed the frame to finish it off.
I love the white and silver together, but this card would be equally impactful with gold and white. If you want to add some drama, gold and black.
Supplies: (and links where possible)
I have listed which products I have used, and where they may be purchased. It’s a huge marketplace and in most instances, there are multiple sources and many alternatives to choose from.
Stencil: Deco Fans, a Colorful Life Designs
Waffle Flower Grip Mat, 8.5 x 6.5, Scrapbook.com
Dies:
Wedding Couple: Impression Obsession (no longer in business)
Nesting Circle Infinity Dies, Hero Arts
Ink: Silver Shine, Lisa Horton, Glitter & Ink
Blending Brushes: Stampin’ Up!
Versafine Onyx, Simon Says Stamp
Adhesive: Tombow Aqua, Michaels
Card Base & Card Face: Accent 100 lb., Amazon
Do you have comments or thoughts to share on this design? Drop me a line in the Comments Section below – I’d love to hear from you!
You can also use the Comments Section to be added to the list, and notified when I release new work.
Say I love you with a whimsical handmade Easter card

Would you like to experiment with a design like this? You’ll find a supply list below, including a link to the stencils I used from A Colorful Life Designs. Follow the link and use discount code ChrisFan10 to save 10% on your entire order! (Master Creator Bundles are excluded as they already have a 20% discount built in.)
Easter means bunnies, chocolate, and celebrating traditions created over the years. Sending a card is a wonderful way to send a hug to someone you can’t be with.
Let’s get Started:
Card Base: 5.5 x 8.5, scored and folded at 4.25
Border Layer: 5 x 4
Card Face: 5 x 4
Card Face:
- After laying the card face on my Grip Mat, I positioned the Easter egg stencil.
- I applied blue ink to the bottom and pink ink to the top, going back and forth between the two colours until I got a smooth blend where they met.
- After removing that stencil, I positioned the bunny stencil so that the bunny on the right was in the correct position.
- I masked off all necessary areas around the bunny and applied gray ink across the exposed surface.
- I repositioned the stencil to place the bunny on the left in the right spot, and again added gray ink after masking off all necessary areas.
- I used a punch on all four corners of the card face to create the peek-through design.
Other:
- Using a scrap piece of cardstock, I stamped the Happy Easter sentiment with Versamark embossing ink.
- I sprinkled this with silver embossing powder and set it with my heat gun.
- I ran this through my Big Shot and cut it down with a small banner die.
- I applied gray ink to the corners of the border layer. (This ensured a match to the bunnies on the card face, and was more economical than using a piece of cardstock.)
Assembly
- I put dimensional foam on the back of the border layer, and then glued the card face on top of this, allowing the gray ink to show through the punched-out design.
- I centered this on the card base.
- I glued the banner on top of the Easter egg, in between the bunnies’ hands.
- I added tiny rhinestones to the center of the flowers on the Easter egg.
Final Thoughts:
I love these two stencils together: I’ve been eyeing the Bunny Dance stencil for a while now, and I’m so happy that I got it.
Supplies: (and links where possible)
I have listed which products I have used, and where they may be purchased. It’s a huge marketplace and in most instances, there are multiple sources and many alternatives to choose from.
Stencils:
Cute Easter Egg: A Colorful Life Designs
Bunny Dance, A Colorful Life Designs
Waffle Flower Grip Mat: Scrapbook.com
Versamark Embossing Ink: Simon Says Stamp
Silver Embossing Powder: Hero Arts, Simon Says Stamp
Ink: Stampin’ Up!
Blending Brushes: Stampin’ Up!
Adhesive: Tombow Aqua: Michaels
Card Base & Card Face: Accent 100 lb., Amazon
Do you have comments or thoughts to share on this design? Drop me a line in the Comments Section below – I’d love to hear from you!
You can also use the Comments Section to be added to the Notification list, and be contacted when I release new work.
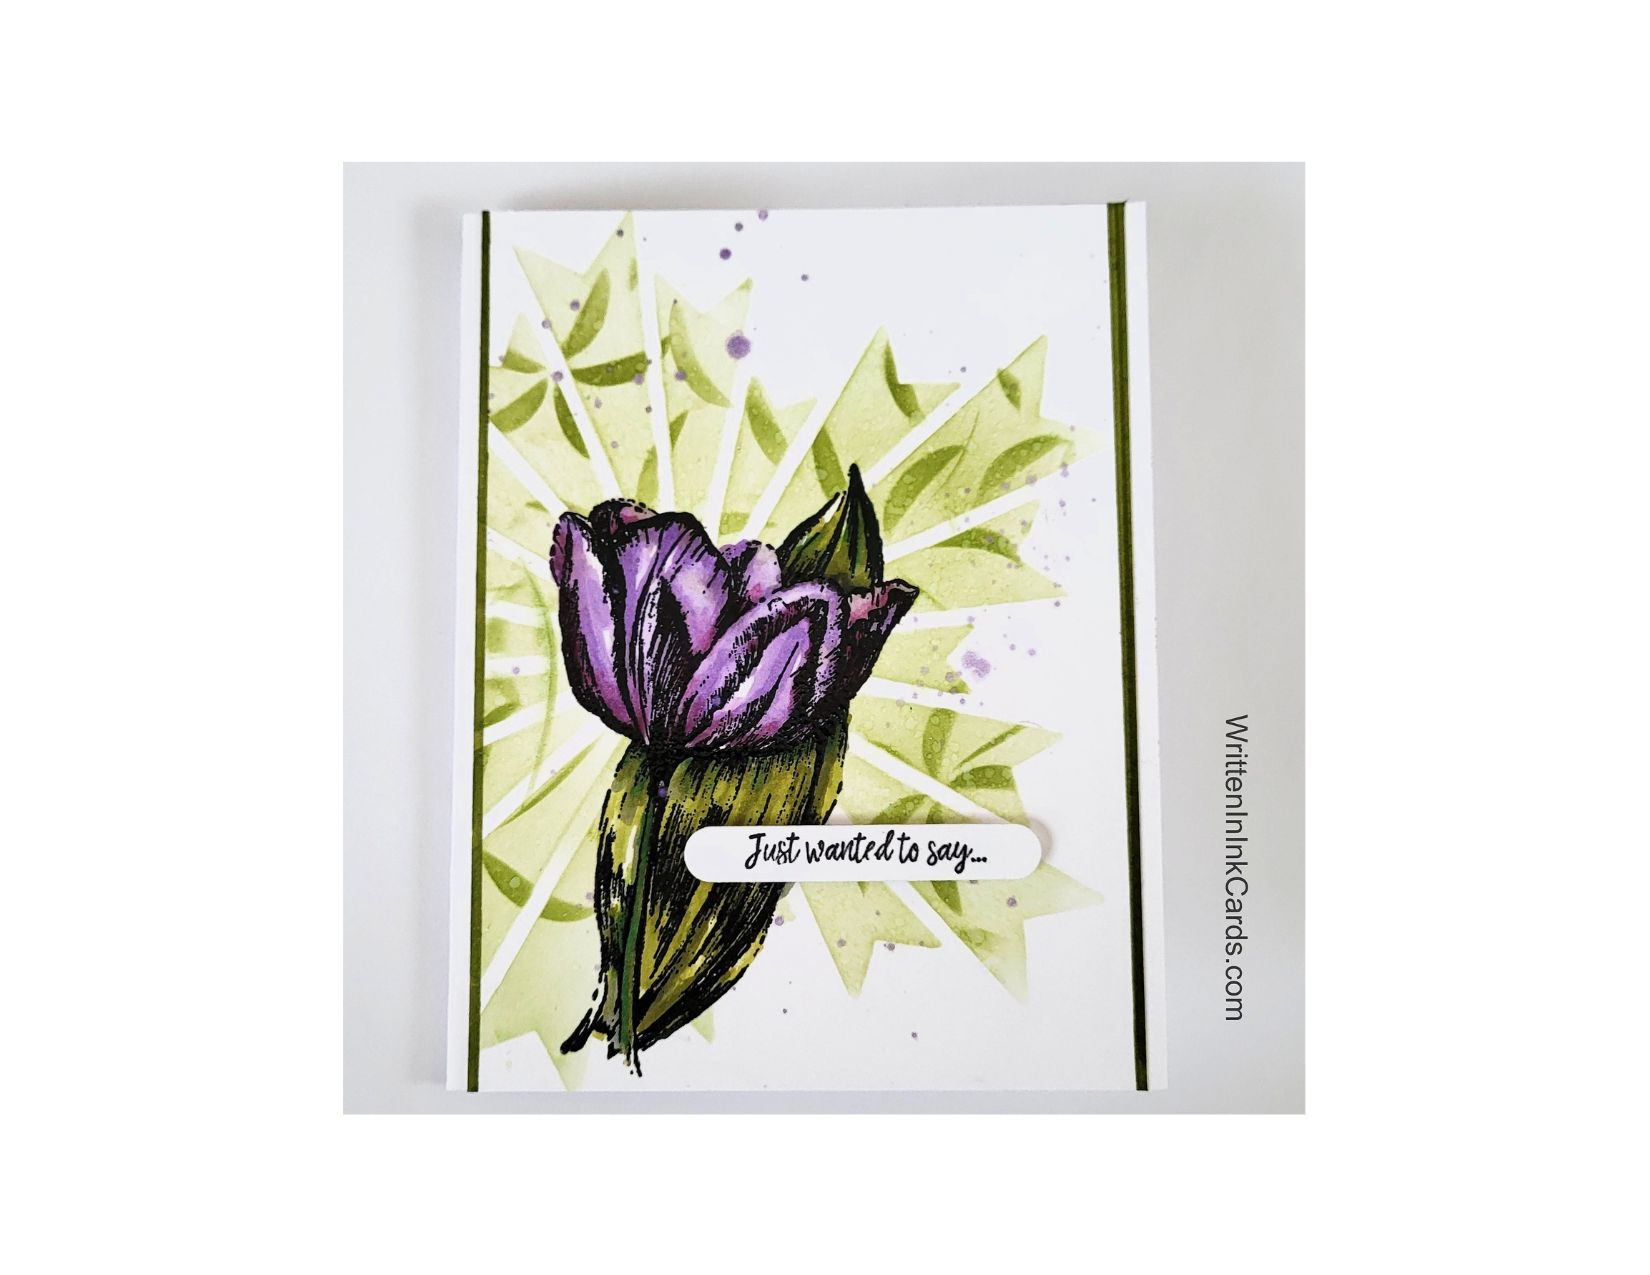
When handcrafted is heartfelt: Tips for Stunning Card Designs

Would you like to experiment with a design like this? You’ll find a supply list below, including a link to the stencils I used from A Colorful Life Designs. Follow the link and use discount code ChrisFan10 to save 10% on your entire order! (Master Creator Bundles are excluded as they already have a 20% discount built in.)
Let’s get Started:
Card Base:
4.25 x 11, scored and folded at 5.5
Card Face: 3 ⅞ x 5.5
Card Face:
- I laid my card face on the Grip Mat and positioned the Starry Rays stencil so that it was hanging off on the left hand side. I used light green ink across the exposed surface.
- Leaving that stencil in place, I secured the Floating Flowers stencil, applying a darker green ink over the exposed areas.
- I removed both stencils and spattered water lightly over the ink, blotting off quite quickly. This added texture and depth to this part of the design.
- I placed the card face in my Stamp Positioner and used Memento ink to stamp the image of the tulip.
- I coloured this with alcohol markers.
- I spattered purple metallic watercolour over the card face.
Other:
- I looked through my binder of sentiments and selected one that worked for the design.
Assembly
I added the card face to the card base, centering vertically.
I used a dark green marker and a ruler to draw a line down each side of the card face, creating a faux border layer.
I put dimensional foam on the back of the sentiment and put it in place as shown.
Final Thoughts:
I love this bold tulip, and the stencils created a fabulous background for it.
Supplies: (and links where possible)
I have listed which products I have used, and where they may be purchased. It’s a huge marketplace and in most instances, there are multiple sources and many alternatives to choose from.
Stencils:
Starry Rays, A Colorful Life Designs
Floating Flowers, A Colorful Life Designs
Waffle Flower Grip Mat, 8.5 x 6.5, Scrapbook.com
Versamark Embossing Ink: Simon Says Stamp
Stamps: Sketched Tulip, Technique Junkies (no longer available)
Ink: Stampin’ Up!
Blending Brushes: Stampin’ Up!
Versafine Onyx, Simon Says Stamp
Memento Ink: Stampin’ Up!
Alcohol Markers:
Stampin’ Blends: Stampin’ Up!
Copics: Wallacks
Adhesive: Tombow Aqua, Michaels
Card Base & Card Face: Accent 100 lb., Amazon
Do you have comments or thoughts to share on this design? Drop me a line in the Comments Section below – I’d love to hear from you!
You can also use the Comments Section to be added to the list, and notified when I release new work.
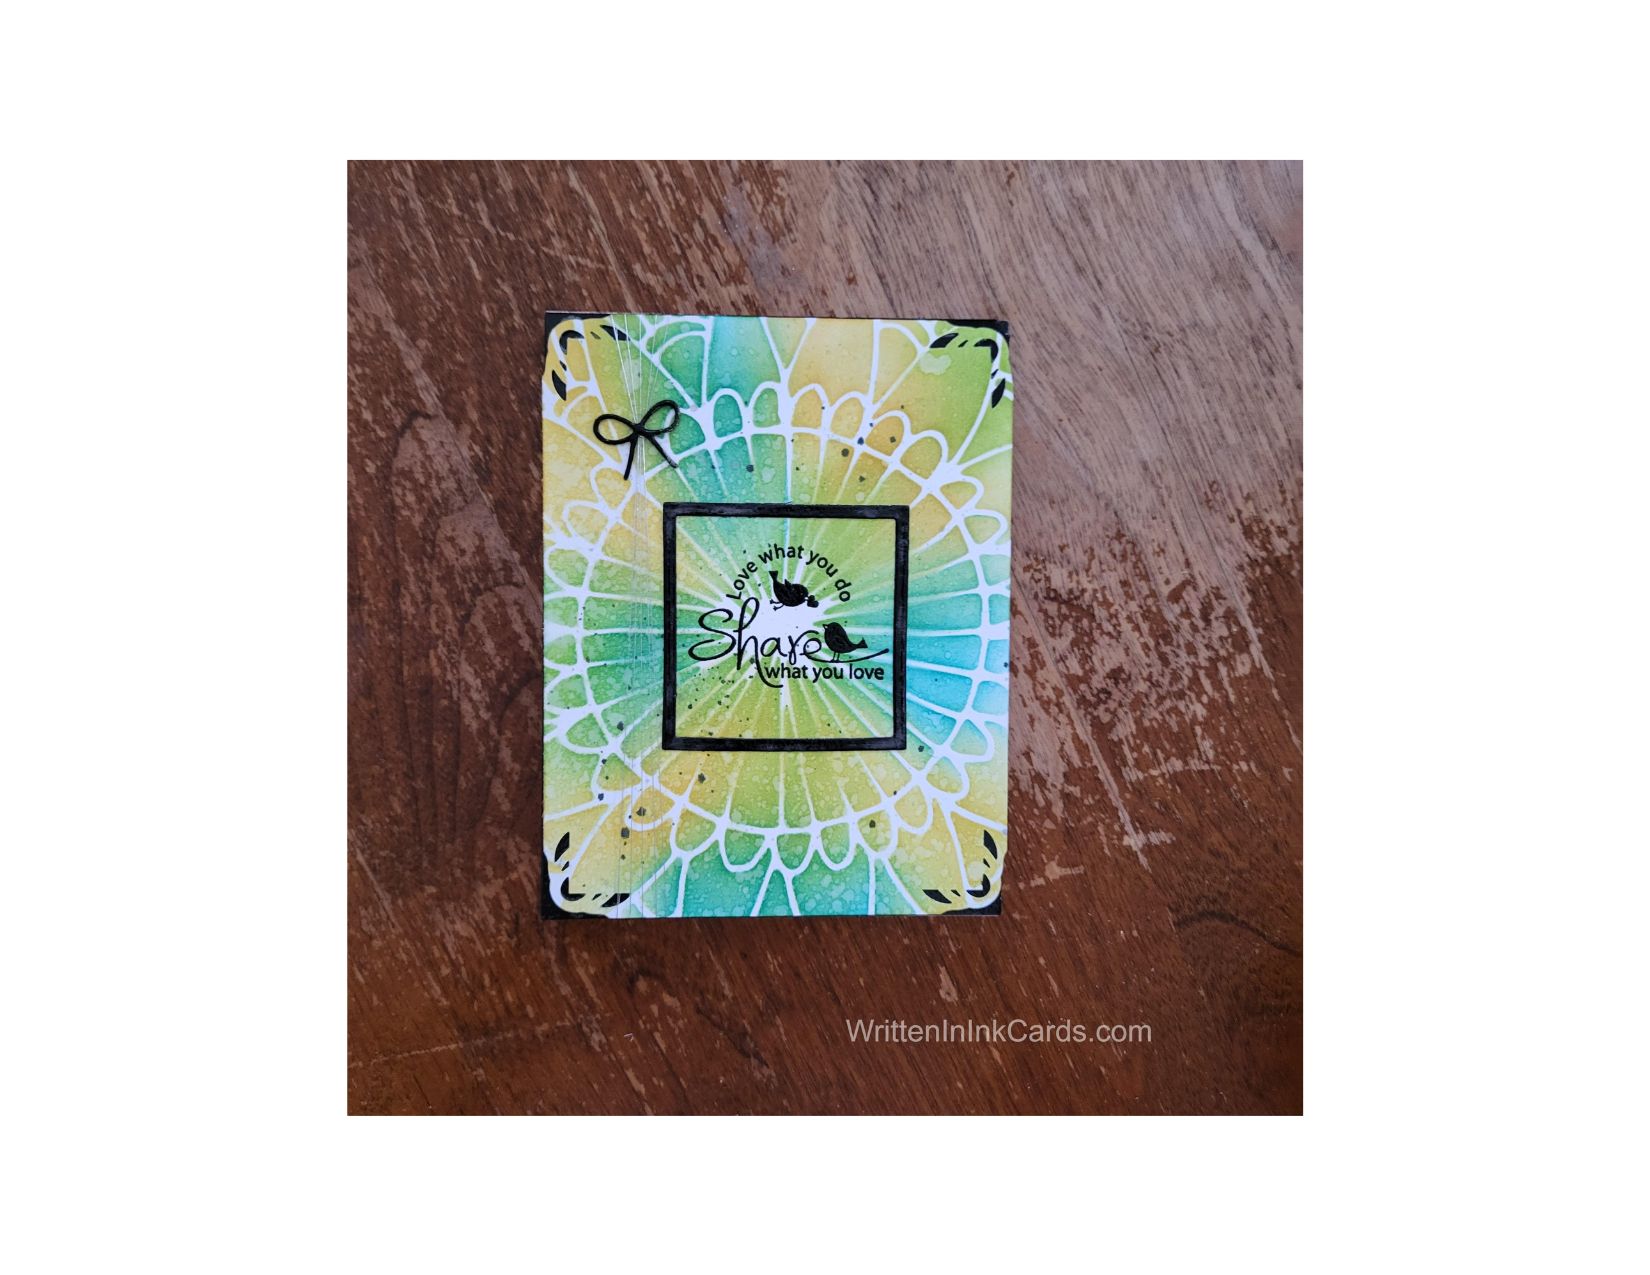
Love What You Do, Share What You Love

Would you like to experiment with a design like this? You’ll find a supply list below, including a link to the stencil I used from A Colorful Life Designs. Follow the link and use discount code ChrisFan10 to save 10% on your entire order! (Master Creator Bundles are excluded as they already have a 20% discount built in.)
This card was created to thank a very talented instructor after a weekend of intense musical coaching. Whether making cards, singing or something else entirely — love what you do, and find time to do it.
Let’s get Started:
Card Base: 5.5 x 8.5, scored and folded at 4.25
Border Layer: 5.5 x 4.25
Card Face: 5.5 x 4.25
Scraps of black cardstock for frame and bow
Card Face:
- I laid the card face down on my Grip Mat and positioned the stencil.
- Using light turquoise, lime green and yellow I applied colour across all exposed surfaces.
- I went back over the entire surface, blending colours where they met and intensifying where necessary.
- I put the card face aside, allowing the ink to dry completely.
- After removing the stencil, I put the card face into the stamp positioner and put my Love What You Do stamp in place.
- I laid a piece of acetate over the card face and stamped on this first to be certain that I was happy with the placement. (Was it straight? Did it need to be higher? lower?) Once I was satisfied that it was centered and straight, I removed the acetate and stamped the image with Versafine Onyx.
Tip: Versafine Onyx is a pigment ink: these stay wet long enough to add embossing powder and set for great results.
- I sprinkled clear embossing powder over the Versafine, and set this with my heat gun.
- I lightly spritzed the card face with water, blotting it off with a paper towel. This added a lot of depth and texture to the card face.
- I used black reinker to add a bit of spatter to the card face.
- I used a punch on all four corners to add visual interest.
Other:
- I created a matching frame: Using two square dies that were very close in size, I taped them onto a scrap of black cardstock and ran them through the Big Shot. This created the small black frame around the stamped image.
- I pressed the square into my embossing ink pad, sprinkled it with clear embossing powder, and set it with my heat gun. (I did this to give the black cardstock the same depth as the sentiment.)
- I used a die to cut the tiny bow out of black cardstock.
- I wrapped silver metallic thread 5 x around the card face vertically on the left hand side. I secured this with adhesive tape on the back of the card.
- Using a small piece of the same thread, I tied a knot around all of the threads, pulling them in towards the center. After snipping off the ends of this thread I added a tiny bead of glue to be certain that the knot couldn’t come undone.
Assembly
- I glued the black border layer to the card base, and the card face on top of both of these. The black peeked through the design cut into the corners and provided a nice contrast.
- I glued the frame in place around the stamped image.
- I glued the bow in place on top of the metallic thread, over the knot.
Final Thoughts:
I didn’t add any embellishments to this card: the strong contrast and multiple textures meant that there was enough visual interest without anything else.
Both card making and singing fall into the Love What You Do category for me, and I am fortunate to be able to include both in my life. What do you love to do? let me know in the comments below.
Supplies: (and links where possible)
I have listed which products I have used, and where they may be purchased. It’s a huge marketplace and in most instances, there are multiple sources and many alternatives to choose from.
Stencil: Boho Wheel, A Colorful Life Designs
Waffle Flower Grip Mat, 8.5 x 6.5, Scrapbook.com
Versamark Embossing Ink: Simon Says Stamp
Clear Embossing Powder: Wow, Simon Says Stamp
Stamps: this a stamp that I’ve had in my stash for a long time, and sadly I cannot
remember where I purchased it.
Dies: Everlasting Squares, Spellbinders, R&R Scrapbooking
Ink: Stampin’ Up!
Blending Brushes: Stampin’ Up!
Versafine Onyx, Simon Says Stamp
Adhesive: Tombow Aqua, Michaels
Card Base & Card Face: Accent 100 lb., Amazon
Do you have comments or thoughts to share on this design? Drop me a line in the Comments Section below – I’d love to hear from you!
You can also use the Comments Section to be added to the list, and notified when I release new work.
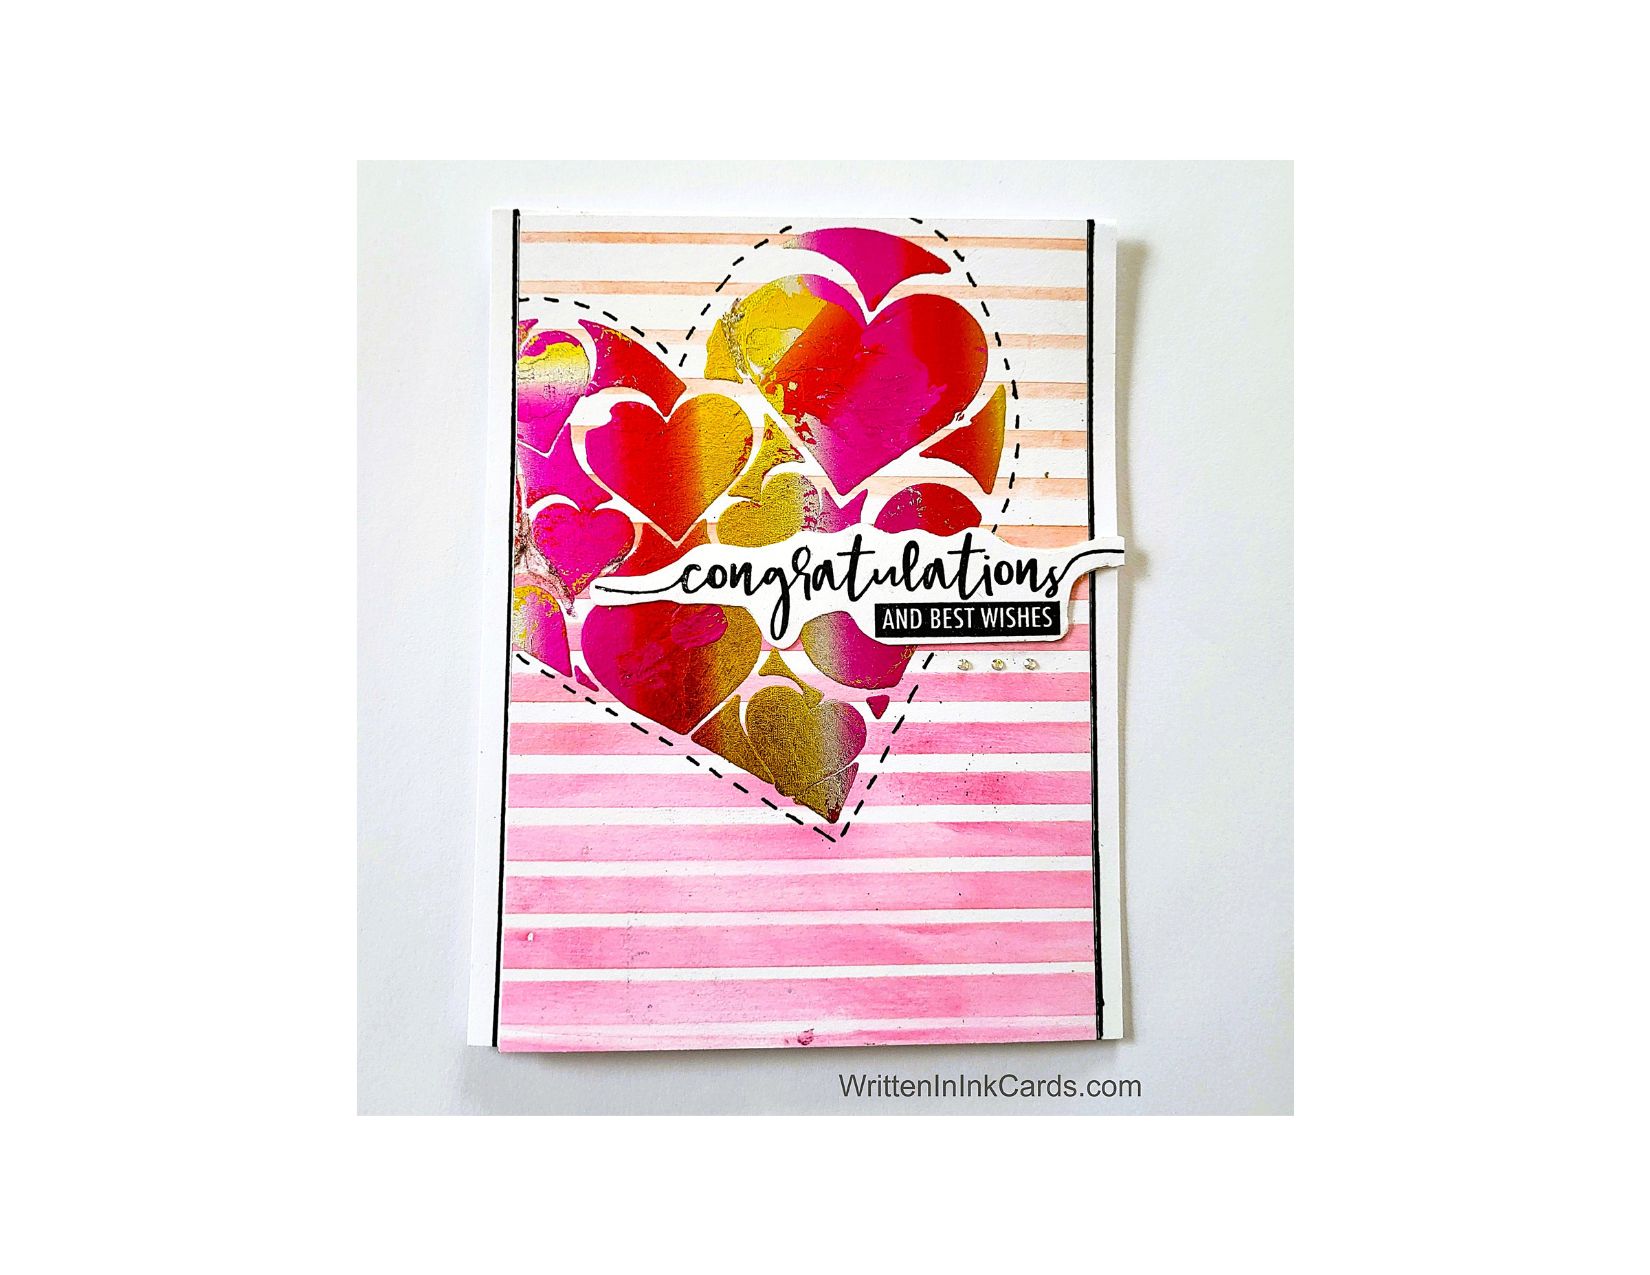
Master Card Making with Simple Innovative Stenciling Techniques

Would you like to experiment with a design like this? Below, you’ll find a supply list, including a link to the stencils I used from A Colorful Life Designs. Follow the link and use the discount code ChrisFan10 to save 10% on your entire order! (Master Creator Bundles are excluded as they already have a 20% discount built in.)
Mixing media and techniques can create stunning results – read more below for a how-to.
Let’s get Started:
Card Base: 4.25 x 11, scored and folded at 5.5
Card Face: 4 x 5.25
Card Face:
- I placed my card face on the Grip Mat.
- I sprayed the back of the Graduated Lines stencil with Pixie spray and waited for about 30 seconds before positioning it on the card face. (The longer, unattached lines of this stencil may shift if not secured.)
- I applied intense pink ink across the bottom of the stencil and then shifted to a softer orange colour before setting this stencil aside.
- I took the Heart of Hearts stencil and scrap copy paper. I traced around the outer edges of the heart where I could. Once I removed the stencil, I joined the gaps to create a complete heart. I then carefully cut it out with an Xacto knife, leaving the borders intact.
- I removed the card face from the Grip Mat and placed it on scrap paper. I positioned the stencil on the card face, securing it with mint tape.
- I laid the scrap paper over the stencil, lining up the cut out opening carefully: the remainder of the scrap paper became a mask.
- I applied Duo Gel to all open areas on the stencil.
- After carefully removing the stencil and putting it in water, I set the card face aside to dry.
- Once dry I laid a piece of transfer foil (previously cut to size) over the now-sticky gel, and ran the card face through the Big Shot.
- When I removed the foil, the Duo Gel held onto the foil, causing the stencilled pattern to remain.
- I added dashes around the outside of the heart, about ⅛” away from the foiling.
Other:
- I stamped the sentiment with Versafine Onyx ink, immediately sprinkled on clear embossing powder and set it with my heat gun.
Versafine Onyx is a pigment ink, which stays wet long enough to allow heat embossing.
- I fussy cut the around sentiment and put dimensional foam on the back.
Assembly
- I glued the card face to the card base, centering vertically.
- I added the sentiment to the card face.
- I added small dashes under the sentiment, echoing those around the heart.
- I used a black marker and a ruler to create the look of a fine black border beside the card face.
Final Thoughts:
I really like the combination of the two stencils – they work so well together. I had initially tried to heat emboss the sentiment to create a flat card, but it was too muted on top of the foil. I solved it by heat embossing the sentiment on white and fussy cutting around it, then lining it up directly over the dud sentiment.
Supplies: (and links where possible)
I have listed which products I have used, and where they may be purchased. It’s a huge marketplace; in most instances, there are multiple sources and many alternatives.
Stencils:
Graduated Lines, A Colorful Life Designs
Heart of Hearts, A Colorful Life Designs
Waffle Flower Grip Mat, 8.5 x 6.5, Scrapbook.com
Versamark Embossing Ink: Simon Says Stamp
Stamps: Loads of Wishes, Avery Elle, Amazon
Fine Liners: Amazon
Ink: Stampin’ Up!
Blending Brushes: Stampin’ Up!
Versafine Onyx, Simon Says Stamp
Clear Embossing Powder: Wow, Simon Says Stamp
Duo Gel: Therm O Web, Simon Says Stamp
Transfer Foil: Summer Rainbow, Therm O Web, Amazon
Adhesive: Tombow Aqua, Michaels
Card Base & Card Face: Accent 100 lb., Amazon
Do you have comments or thoughts to share on this design? Drop me a line in the Contact section in the header – I’d love to hear from you!
Before you go – use the Notifications box (below) to be notified when I release new work.
The Power of Handmade Cards: Why Personalized Greetings Matter
The Power of Handmade Cards
Why Personalized Greetings Matter
Imagine yourself at the end of a busy day, perhaps stopping at the post office to pick up your mail. Flyers, bills, offers for services that you don’t and will never need … but wait, what’s this? An envelope from an old friend you have been thinking of … you quickly tear it open and there is a beautiful handmade card that says “thinking of you”. And instantly your fatigue and general fed-up-edness are gone and the day that you thought would never end has finished with a smile. You will treasure this : somehow it feels like so much more than a text.
…. And that is why a handmade card matters so much, when you send one to someone you care about.